Monday, February 3, 2025

Pure Storage FlashArray File - So Easy, Even Neil Can Do it! - Part I - Setup an SMB and NFS Share

Hi Friends,

It's that time again, So Easy, Even Neil Can Do it!!  As I told you the other day, I'm at Pure Storage now and I'm heads down learning all this great technology.  What's really cool is Pure has two lines of storage for two different purposes, but they BOTH use SSD storage!  

SSD storage is SUPER fast because there's no moving parts.  If you've used computers for awhile, one of the worst sounds you'll hear is a hard drive bearings going bad or if the heads make contact with the platters.  It's not pleasant.


See that line on the platter?  That's bad!  The read/write heads on this hard drive have decided to go platter surfing and that platter is pretty much toast.  I've seen videos where repair techs will open a bad hard drive, remove the scratched platter and bad head, seal up the drive and it sometimes works.  But the data on that particular platter is pretty much toasted for us mere mortals.  Remember when your little sister or brother scratched up your favorite record/CD/DVD and it just never played right again?  Yep, it's kind of like that.

You've probably heard of SSD's since most modern laptops are coming with them.  Notice how fast your laptop boots now?  Remember when you used to turn it on, go to the rest room, go get a cup of coffee, go to a couple of meetings and when you get back your computer is ready to use!

With Pure Storage, there's no more of that, it's all pure SSD goodness!  I'll go into a lot more detail on what an SSD is and what is the Pure approach to SSD performance and longevity in another article.

Pure has two storage lines, FlashArray and FlashBlade.

FlashArray is for scale up.  What is scale up?  That's more traditional storage that you're probably more familiar with.  Fiber channel, iSCSI, file, block, transactional DBs and it's super fast!  Here you've usually got two heads and if one head croaks, the other head takes over.

FlashBlade is for scale out.  What's the difference?  Scale out is traditionally for high performance computing (big data), oil and gas data crunching, object stores, unstructured data, etc.  Here you usually have multiple heads with multiple drives and all the data is spread over all the different arrays to help speed up the number crunching and data retrieval.

I've been spending some time with FlashArray and it's super simple to set up file access for SMB and NFS all from the same GUI AND both Linux/Unix hosts using NFS can access the same SMB shares that Windows boxes are using, AMAZING!  Literally with a few clicks and some information, you can be serving files and filesystems to your customers.  Oh and did I mention how crazy fast the array is??

Remember the fun of setting up Samba?  Well no more!  Watch how cool this is!

1. Add your array to Active Directory so it can start authenticating users.  If you're not an AD shop and you'd like to use LDAP, you can do that too, but for this example I'm using AD.


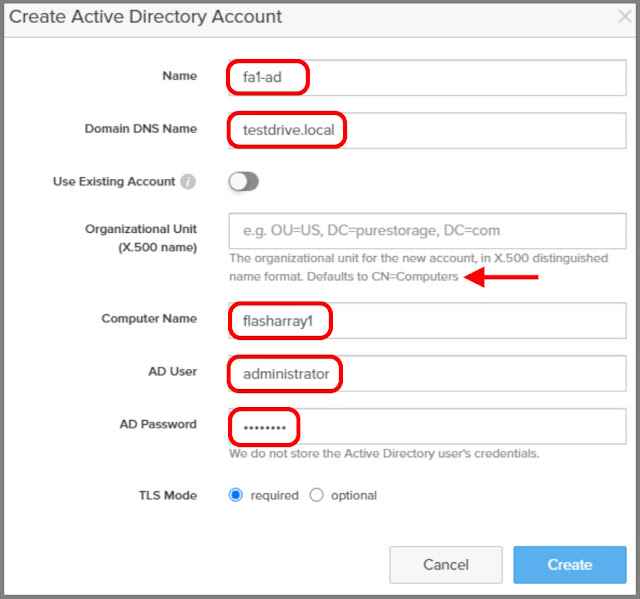
2.  Let's connect up to AD:
     Name - That's just what you want to call this connection.
     Domain DNS Name - This is the domain's name and you can get this from AD.
     Computer Name - Enter in the name of your FlashArray.
     User - This is the local administrative user for the FlashArray.
     Password - Put in the password for this user.

Click on Create and you're connected to AD. 

Note:  I didn't put anything in for my OU.  If you don't put anything in, you'll be defaulted into the CN= Computers group.


3.  Next we'll setup our File Systems for SMB and NFS.  This is super simple and you just need to follow 1-4.  Directory Quotas are not necessary, but they really do help keep your users from abusing the space you give them.  Let's go through each step together!


4.  Give your new File System(s) a name.


5. Notice a Directory was created when we created our File System?  That's the root filesystem.  We can use this if we want, but it's a best practice to create sub-directories to better organize your data repositories.


6.  Let's create our sub-directory by clicking on the + sign.  For File System, we'll select the file system we just created.  Give the sub-directory a name and a path that makes sense to you.


7. Now we'll export our share.  Select the directory you just created and give this new export a name.  Here's where you get a bunch of granular control.  You can either use the simple NFS and SMB default policies, or you can create your own.  I'm going to use the default policies for now.  

Something really important to remember.  Don't forget to Enable the share.  If you'd like to disable it at any time, it's as simple as flipping the switch.


8.  And that's really it!  If you want more granular control, you can setup quotas and specific policies, which I'll do at a later time.  But for now, let's connect to our share!

9.  Go to your Windows icon in the lower left corner of your screen and click it.  In the search bar type in two backslashes and the IP address of your Data VIF.  You can get your Data VIF from Settings > Network > Connectors.


10.  Linux would be just as simple except you need to mount the new NFS share with the mount command:
sudo mount -t nfs x.x.x.x:/directory1 /mnt/directory1

That's it!  Start using your share!!


***IMPORTANT INFORMATION***
I wanted to point out a few gotchas that are easy to overlook when you're setting up your share.

1.  Make sure your File Interface, Physical or VIF,  is Enabled.  -  It's very simple to over look this.  Spend a little time getting to know your connections and your networking.


2. Make sure your Directory Exports are Enabled.


3.  Make sure your Policies are Enabled.


4.  Make sure the Export itself is Enabled.  We did this back in step 7, but it's still an easy on to overlook.


Hope you enjoyed my first - So Easy Neil Can Do it with Pure Storage FlashArray!  Be on the lookout for additional blogs!

Neil

Wednesday, January 29, 2025

Neil's Now with Pure Storage and NTLM vs. Kerberos

Hi Friends,

Big update!  I'm now with Pure Storage!  I'll be focusing on FlashArray and FlashBlade File protocol.  I'm super excited and already wrote a blog for you!

I've been researching Active Directory authentication methods and I heard that NTLMv2 is being deprecated by Microsoft.  I thought I'd do a little research around what NTLM is and why you should probably migrate to Kerberos.  Hope you enjoy!


Kerberos vs. NT LAN Manager - Battle of the Windows Authentication Protocols

Data security, we all hear about it, we’ve all had to take training on it and our IT departments are constantly sending us phish to reinforce that if you’re connected to the Internet, you’re vulnerable to a threat actor attacks.

With that said, ever hear of Windows NT LAN Manager?  Windows New Technology LAN Manager or NTLM was first introduced in 1993 as part of Windows NT 3.1.  The successor, NTLMv2 was released in 1996 in Windows NT 4.0 Service Pack 4 (SP4).  NTLM and its second version is a suite of security protocols created by Microsoft to authenticate users’ identity.


How does it work?  Typically it’s follows these 8 steps:

  1. The user shares their username, password and domain name with the client.
  2. The client develops a scrambled version of the password, or hash, and deletes the full password.
  3. The client passes a plain text version of the username to the relevant server.
  4. The server replies to the client with a challenge, which is a 16-byte random number.
  5. In response, the client sends the challenge encrypted by the hash of the user’s password.
  6. The server then sends the challenge, response and username to the domain controller (DC).
  7. The DC retrieves the user’s password from the database and uses it to encrypt the challenge.
  8. The DC then compares the encrypted challenge and client response. If these two pieces match, then the user is authenticated and access is granted.

Sounds pretty solid, so why is Microsoft replacing it with a new protocol?  Well, NTLM has several known security vulnerabilities related to password hashing and salting.  With NTLM, passwords stored on the server and domain controller are not “salted”, meaning that a random string of characters is not added to the hashed password to protect it from cracking techniques.

This means that threat actors who possess a password hash do not need the underlying password to authenticate a session. As a result, systems are vulnerable to brute force attacks, which is when an attacker attempts to crack a password through multiple log-in attempts. If the user selects a weak or common password, they are especially susceptible to such tactics.

NTLM’s cryptography also fails to take advantage of new advances in algorithms and encryption that significantly enhance security capabilities.

Why Kerberos?

Kerberos, named for the three headed Greek underworld guard dog, was first introduced in 1983 and has steadily been upgraded through the years, and follows this security method:

  1. A client seeking authentication.
  2. A server the client wants to access.
  3. The ticketing service or key distribution center (KDC).

Unlike NTLM’s 8 step process, Kerberos uses 12 steps for security authentication:

  1. The user shares their username, password, and domain name with the client.
  2. The client assembles a package, or an authenticator, which contains all relevant information about the client, including the user name, date and time. All information contained in the authenticator, aside from the user name, is encrypted with the user’s password.
  3. The client sends the encrypted authenticator to the KDC.
  4. The KDC checks the user name to establish the identity of the client. The KDC then checks the AD database for the user’s password. It then attempts to decrypt the authenticator with the password. If the KDC is able to decrypt the authenticator, the identity of the client is verified.
  5. Once the identity of the client is verified, the KDC creates a ticket or session key, which is also encrypted and sent to the client.
  6. The ticket or session key is stored in the client’s Kerberos tray; the ticket can be used to access the server for a set time period, which is typically 8 hours.
  7. If the client needs to access another server, it sends the original ticket to the KDC along with a request to access the new resource.
  8. The KDC decrypts the ticket with its key. (The client does not need to authenticate the user because the KDC can use the ticket to verify that the user’s identity has been confirmed previously).
  9. The KDC generates an updated ticket or session key for the client to access the new shared resource. This ticket is also encrypted by the server’s key. The KDC then sends this ticket to the client.
  10. The client saves this new session key in its Kerberos tray, and sends a copy to the server.
  11. The server uses its own password to decrypt the ticket.
  12. If the server successfully decrypts the session key, then the ticket is legitimate. The server will then open the ticket and review the access control list (ACL) to determine if the client has the necessary permission to access the resource.

In a nut shell, why is Kerberos better than NTLM?

Microsoft has said that as of July 2024 that NTLM is deprecated and no further development will be made to it.  It’s not clear when Microsoft will remove NTLM support from Windows, but the message is clear, time to move to a more secure authentication protocol, like Kerberos.

Kerberos advantages:

  1. More secure: No password stored locally or sent over the net.
  2. Best performance: improved performance over NTLM authentication.
  3. Delegation support: Servers can impersonate clients and use the client's security context to access a resource.
  4. Simpler trust management: Avoids the need to have p2p trust relationships on multiple domain environments.
  5. Supports MFA (Multi Factor Authentication)

Three big disadvantages of NTLM are:

  1. Single Authentication - NTLM is a single authentication method. It relies on a challenge-response protocol to establish the user. It does not support multifactor authentication (MFA), which is the process of using two or more pieces of information to confirm the identity of the user.
  2. Security Vulnerabilities - The use of password hashing makes NTLM systems vulnerable to several modes of attacks, including pass-the-hash and brute-force attacks.
  3. Outdated Cryptology - NTLM does not leverage the latest advances in algorithmic thinking or encryption to make passwords more secure.

NTLM has been leveraged in cyberattacks known as NTLM Relay attacks, where Windows domain controllers are taken over by forcing them to authenticate malicious servers.  Password hashes can be stolen and used in a pass-the-hash attacks using stolen passwords from phishing or stolen Active Directory databases.

Recent NTLM Attacks:

  1. New Windows zero-day exposes NTLM credentials, gets unofficial patch
  2. Microsoft patches Windows zero-day exploited in attacks on Ukraine
  3. New Windows Themes zero-day gets free, unofficial patches
  4. Exploit released for new Windows Server "WinReg" NTLM Relay attack
  5. Microsoft discloses unpatched Office flaw that exposes NTLM hashes
  6. Microsoft fixes Windows Server bug causing crashes, NTLM auth failures
  7. Hackers steal Windows NTLM authentication hashes in phishing attacks

Resources:

  1. https://learn.microsoft.com/en-us/windows/whats-new/deprecated-features
  2. https://www.bleepingcomputer.com/news/microsoft/microsoft-deprecates-windows-ntlm-authentication-protocol/
  3. https://www.crowdstrike.com/en-us/cybersecurity-101/identity-protection/windows-ntlm/
  4. https://answers.microsoft.com/en-us/msoffice/forum/all/ntlm-vs-kerberos/d8b139bf-6b5a-4a53-9a00-bb75d4e219eb