Hi Folks,
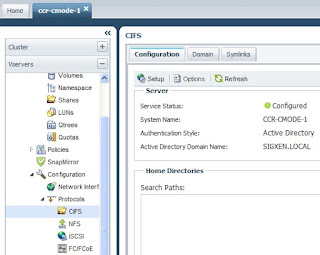
Something that really got me running in circles when I was setting up my clustered ONTAP system was CIFS! CIFS is easy to setup on clustered ONTAP, but there's one step that's easy to forget and can REALLY cause you to pull out your hair if you're not aware of it.
1. So you've created a brand new Vserver and you're ready to setup CIFS! You head into System Manager and configure your CIFS server.
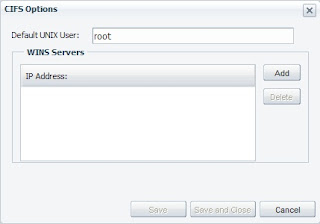
2. You assign a user default Unix user.
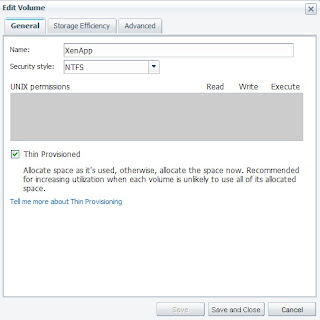
3. You've created a volume, made it NTFS.
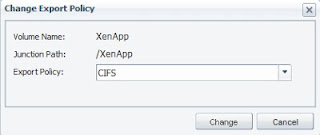
4. Created an export policy for the share and told it to run CIFS.
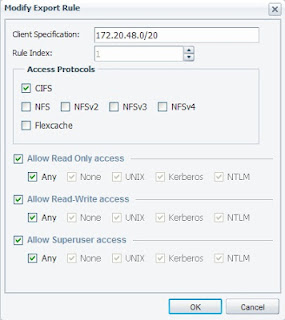
5. Created an export rule so your client machine can access the share.
6. Map the drive from your Windows machine and TA-DA! WHAT?! Permission Denied?!
My friends you've done everything correct, you've just forgotten one easy step. Since your junction path is under "/" you need to create the "pcuser" so you can share out the path.
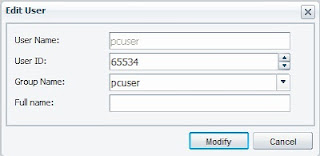
7. Go to Local Users and Groups under Configuration and select UNIX. Create a Group called "pcuser" with the Group ID of 65534 and then create a user called "pcuser" with User ID of 65534. Assign that user to the group, re-map the drive and TA-DA! Your CIFS share should now work!
I hope this was helpful and that it will save you from pulling out the hair in your head that I've already pulled out of mine!
Until Next Time!
Thursday, February 28, 2013
Wednesday, February 27, 2013
Everything you Always Wanted to Know about Sysprep
Must share this with you! I found this KB article a couple of years ago and it's just as helpful as the day I found it. Are you having trouble with Sysprep or are you using older versions of Windows and having trouble finding Sysprep? This is a great article will give you everything you need and MORE!
For my readers unfamiliar with Sysprep, it's a utility provided by Microsoft that will let you erase the identity of a Windows machine, but keep all the programs, etc. When you start cloning Windows machines this tool is vital since multiple machines trying to access the domain as the same machine will seriously ruin your day!
Enjoy!
Every Man's Tech - Part III - VDI
Hi All,
So now that I've given you a brief understanding of virtualization, let's talk about VDI. VDI stands for virtual desktop infrastructure. For anyone who remembers terminal/mainframe, this isn't far from that concept. I've noticed that every so many years administrators try to take control of everything and put it onto one gigantic box. Users log in in one way or another and use applications. It's been given lots of names over the years, but the idea is the same. Ease of administration by having a single source to administer and safe guard the data by keeping it in one place. The problem was that technology hadn't caught up with the idea yet. So you had users waiting forever for applications to open, network issues causing outages, and at the end of the day, a very unhappy user.
With the speed, cost of servers and the ever increasing use of technology I think the time is right to try pulling everything back in with VDI. So am I saying the data 20 years ago wasn't as important? No, of course not, but think about this. When we first got email it was a fun toy. It often went down and we didn't rely on it as a mission critical application. Now days, we assume the email infrastructure will be up 100% of the time and if you send an email you expect the recipient to GET the email! My point is we've digitized our lives and have entrusted more data to computers than ever before. When was the last time you WROTE your contacts into an actual book? :-)
So what's a virtual desktop? Basically, it's just like server virtualization except instead the machine running Windows 2008 it's now running Windows 7. That's a VERY simplified view, so let's drill down a bit. There are bunch of different scenarios, but when providing a virtual desktop, you basically have two choices. A persistent desktop or a non-persistent desktop. A non-persistent desktop is basically a read only image. What are the use cases for these? Libraries, call centers, hospitals. Basically anywhere users login, do some work on an application and when they logoff, the desktop reverts back to it's original state? Why you ask? Because users have destructive powers and if there is a way to break something, they will! But in all seriousness, if there is no need for customization of the desktop, having a read only image makes administration MUCH easier. Plus think of all the space you'll save? If you have 1 read only image of Windows 7 that's 30 gigs and 10,000 images checked out at once, that will save you a TON of space.
Now in the VDI world, the "low hanging fruit" is the non-persistent desktop. User's login, and they go away. But what about your work computer that has the picture of your kids as the background? Or iTunes installed on it? You've customized it, the icons are just where you like them! Just like my messy desk. I know where everything is, if someone came and cleaned it up every time I left I'd be pissed off and wouldn't be able to find a thing. So here's where we get into the persistent desktop. Persistent desktops are a pain because now you actual desktops you have to maintain. Granted they're VMs, but you'll still have to apply virus scanning, OS patching, back up and recovery and there's always the user that needed to free up some space so he/she deleted all of their system files.
So how do we bridge this gap between non-persistent and persistent? We'll use a product that allows for profile redirection. What's that? Basically you'll login to a non-persistent image that's read-only and a cool program like Microsoft Roaming Profiles, Liquidware Lab Profile Unity, Citrix profile management, etc. will perform some magic. So what's a profile? All of the information that makes a desktop "your" desktop is stored in your profile. Your desktop background, all the junk you store in My Documents, etc. Take a look sometime, explore your C: drive, but please, PLEASE, PLEASE, don't start to delete stuff cause you don't think you use it! :-) Check under \Users\ and you'll probably see you, administrator, and if someone else uses your computer they should be there too. If we use one those tools I mentioned earlier, that information is moved from C:\ which is your local hard drive to a network share and Windows is pointed there instead.
Let's talk a bit about network shares. Windows administrators realized early on they needed a way to store stuff off user's machines and put it else where? Why? Usually for space and backup and recovery reasons. Plus it's easier to store stuff in one location and have users point to it. Go to Windows Explorer and click on Tools and you'll see "Map Network Drive", that's the way to map it on your side. On the admin's side it can be a number of different technologies. I can be a Windows server with a large hard drive sharing specific folders, a Unix box running Samba, or a storage array running CIFS. Remember I told you earlier that a hard drive is a like a baby, it has no identity until it's adopted by the computer? Well, CIFS stands for the Common Internet File System. Instead of the individual server providing an identity to this drive we indicate that it will run CIFS at the storage layer and this is a filesystem Windows machines can recognize. The neat thing about providing users storage this way is you can give them as much or little privileges they need.
Back to VDI. Most VDI implementations run with Microsoft Active Directory. Active Directory allows for users to login to a "domain" of users where there are rules and regulations placed on the users. There's TONS of stuff you can do with AD but remember it's basic function is to allow for computers, printers, storage to all play together nicely. I login to my non-persistent desktop and AD or my profile redirection software says, "Ah, I know this guy, his name is Neil and his profile lives on Z:\Users\neil". With that, my background image loads up and all the junk I stored on my desktop reverts back to the messy state I left it in! What do I see? If everything is working correctly, NOTHING! Everything should just work as expected.
Who are the key players in the VDI space? I'd say the two most popular are Citrix XenDesktop and VMware View. Both are great products and if you're a long time reader, you'll notice most of my blogs circle around Citrix XenDesktop. Not because View is a bad product, it's just where my expertise is. How do these products work? Basically they add a layer on top of your virtualization hypervisor, which is called a connection broker. What do they do? In the most basic sense, they broker connections between you and your desktop located on that hypervisor. Remember there's a whole heck of a lot more users then there are servers so you're going to need that connection broker to help you keep track of who's who and who goes where.
I hope you enjoyed my intro to VDI, one of my readers sent me some suggestions for future topics so I'm totally jazzed and will be focusing on those soon! Thank you Gustavo! Keep those ideas coming in or I'll just keep babbling about what I like!
Until Next Time!
Tuesday, February 26, 2013
Every Man's Tech - Part II - Virtualization
Virtualization.... So there's a ton of buzz around this word, virtual this, virtual that, so what does it mean and why is there so much excitement around it? Back when I was a system administrator, the application folks would come to me and let me know they had a new application they were bringing in house and needed a system to run it on. Typically it would require a mid tier system, but the requirements were usually for peak performance. So what does that mean? Approximately 90-95% of the time the server would probably be sitting idle. As time went on, more and more of these servers kept popping up and by the time I knew it, we were out of space and the datacenter guys were telling me I was running out of power too.
So here I had multiple mid to large tier machines, mostly sitting idle, but powered on 24 hours a day soaking up power, cooling and space. The worst thing is when one of these machines would get hung in the middle of the night and no amount of swearing would unfreeze it! This was before remote control power supplies... So into the office I'd have to drive at 2AM, turn the power off, power it back on, make sure it was happy and then go home.
So what happened next? Servers kept getting faster and faster, but the departments that bought them didn't want to share them because they felt it was "their" server since they purchased it. If we did get a department to share and there was any performance issues, they instantly blamed the other applications on the server and we had to prove that it wasn't the other applications causing the problems. A very time consuming process!
Now granted, virtualization is not a new concept, if you Google it there's a timeline that shows virtualization going back to the 60's. But when it really started to gain some traction was in the early 2000's. I began hearing about this product called VMware and when I got to see it for the first time I was amazed! So how did it work? Well, you installed a program on a Windows machine and when you launched it, it would ask you what operating system you wanted to run, Windows, Linux, etc. how much space you wanted to give to this machine and than you would provide it with installation media, just like you would if you were installing it on it's own machine. After the install was complete, the "virtual" machine had it's own identity, IP address, etc. You could log into it and install programs on it completely separate from the parent machine. How cool is that?! Plus, the greatest feature of all, the reset and power off buttons!!! I would no longer need to go into work at 2AM to power off a machine!!!!
VMware has a lot of different products and what I was running was a product that installed onto a live OS. They also have products that install onto a bare machine to avoid the over head of running on another machine, but the concept is the same. You take a powerful machine, run this software that allows you to install other operating systems, share resources and administer it from a single location. So now, instead of 10 individual servers that are running idle most of the time, I can virtualize these 10, bump up the utilization on the single server and I can eliminate the power, cooling and space of 9 servers! The thing to remember is that virtualization doesn't give you extra resources. If a virtual server requires 10 gigs of memory and your parent server has 100gigs, you only have 90gigs left of memory. There are times when you can over provision, but you do need to be careful that you have enough resources for everyone to share.
So who are the major players in the virtualization market these days?
1. VMware - ESXi, Workstation
2. Citrix - XenServer
3. Microsoft - HyperV
4. RedHat - RHEV
Since I didn't receive any suggestions for topics I'm just going to keep babbling on what I think you might want to read. :-)
Friday, February 22, 2013
Every Man's Tech - Part I - RAID
Ahoy,
Sometimes, okay a lot of times, I forget I live in a unique microcosm where we throw around terms like VDI, RAID, FC, iSCSI, CIFS, SATA, SAS, SSD, etc and forget that most people look at us like we're from Mars when we start mumbling about this stuff. I suppose it happens in whatever industry you get into, but the acronyms get out of control and soon you're using more acronyms than actual words. I should have known something was up when my father, a brilliant man, reads my blogs and says, "I've read the whole thing and have NO idea what you're talking about." I suppose it's like I'm talking in code, so my Sister and Nephew gave me a great idea, write a blog for the layperson. While discussing the idea with my wonderful wife, she told me how about writing a series of blogs. I think it's a great idea and hope you will to. I dedicate this series to Matt, Michelle and Sandy.
I figured I'd start with RAID since storage really is built on on it. So what does RAID stand for? Redundant Array of Inexpensive Disks. Okay, but what does it MEAN? So in the good 'ol days hard drive sizes were, small, I mean REALLY small. Forget gigabytes, I'm talking megabytes. So you had a bunch of 10meg hard drives, what did you do with them? Well, some brilliant folks came up with a great idea, take all of these cheap, well sorta cheap, drives and get the OS to lump them all together into one big blob.
You have to remember that a new hard drive is like a new born child. It doesn't have an identity nor does it know what it's purpose is until someone names, feeds, and nurtures it. The same holds true for a hard drive. When you put it into a computer, the computer adopts the drive, gives it a name, a file system type and begins to use it to store data.
So what if we took a bunch of drives, put them into an enclosure, because the computer just doesn't have enough room to house all the drives, and call it a JBOD. What's a JBOD? Just a Bunch Of Disks. Nope I'm not kidding. Attach that JBOD to the computer and with this brilliant code you take 10 individual, 10meg hard drives and turn it into 1 100meg hard drive! How cool is that? Imagine 10 individual Lego blocks. Now line up those 10 blocks, you've got a concatenated storage pool. The problem with concatenation is it's a bit slow cause it has to fill up the first Lego block, than the next, etc.
Which brings me to our first RAID level, RAID 0. Still have those Lego blocks? Keep them lined up. Now, image instead of writing to the first block until it's full, we write to ALL the blocks all at once. A bit confused? Say I'm writing my name to the blocks, with concatenation, I write NEIL to the first block. First I write the N, then the E, next I and finally L. Now instead of that way, I write N E I L across 4 of the blocks simultaneously, bit faster isn't it? That's what's called Striping and it's RAID 0. Striping is very fast, but take away the Lego block that had the N on it. Instead of NEIL, you now have EIL, which is no longer my name. Now image your data is spread across multiple drives in the same way. If you lost a drive, the surviving data wouldn't make any sense.
Okay how can we protect against data loss? Let's take just two blocks. Instead of lining them up, place them one under the other. Now write NEIL to the top block and as you're writing to it, write to the bottom one. This is called mirroring and is known as RAID 1. The problem with this is you're limited to the size of the drive or need to go back and mirror your concatenation which we won't get into. Plus you need to buy an extra drive JUST for mirrored data. Now a days RAID 1 is great for home or small business computers because the single drives in computers are so large you just need to purchase one extra to mirror to protect your data. But what if you need more storage than that? Or want the speed of the striping model?
This leads us to the next RAID level, RAID 0 + 1. Take those 10 Lego blocks and either get 10 more or divide them in half. So you'll have either 2 rows of 10 or 2 rows of 5. Now imagine you're using RAID 1 to write my name to the first row of blocks, when you write the N to the first block, you also write it to the block below it and the same holds true for the E, I, and L. So what are you doing? You're creating a mirror of your stripe, so in case you lose one of your blocks you have a mirror that's got everything on it so your data won't be lost. This is great technology and many storage vendors use this as the preferred method since it's fast AND reliable. The problem? Go back to the beginning of the paragraph. I had you either get 10 more bricks or split the10 into 5. Now back to hard drives. If I want to maintain the 100megs, I need to buy 10 more drives. If I split them in half, I lose half my capacity. So RAID 0 + 1 is great, but it can get expensive.
So what's next? Let's talk about RAID 4. So line up those 10 blocks again. We're going to stripe our data again, but only to 9 of those blocks. The 10th block is going to calculate where all the data is going, that's called calculating parity. So after you write my name, it will know where the N, E, I, and L live on those blocks. Now say I lose the block with the E. If this were RAID 0 my data would be lost even though most of it is still there. With RAID 4 since it was calculating where all the letters were going, when I replace the drive it knows an E is missing and re-builds it! How cool is that?! So it brings your data back from the dead, well sorta. The problem with this? That one little drive has a lot of work to do cause it's constantly calculating what is going where and will become the bottleneck and begin to slow down your writes. Plus that drive is no longer used to store data, it only calculates parity.
What if we share the parity burden? Take your 10 blocks, now instead of number 10 doing all of the parity heavy lifting, let's spread the work across all 10 blocks! You've now got RAID 5. We're still going to lose a total of one drive to parity, but at least one drive isn't getting beat up anymore. This is a great method to keep your data safe and not pay as much since you're only losing one drive to parity. The problem with RAID 5 is there still is the cost of calculating parity. Writes aren't going to be as slow, but won't be as fast as RAID 0 + 1.
What about all the levels in between? There still there but not really used anymore. I hope you enjoyed my Every Man's Tech on RAID technology. Remember this is the building block of modern storage so if you have questions, feel free to ask away! :-) I'm looking for suggestions, for this series, please comment and let me know what you'd like for me to discuss. Cause if you don't I'll just start babbling away on what I want to talk about!
Until Next Time!
Thursday, February 21, 2013
A Look Into The Future!
Ahoy,
A bit of a change, I normally take a look at existing stuff, but I thought I would blab about a very near future that I see. A number of years ago a buddy of mine bought an HP OmniGo. Yep, I'm dating myself, 1995! I thought it was super cool, it had a touch a screen and everything! The important thing is he said to me, "Neil, one day I want my organizer to be my phone and my camera." Back than I just couldn't get my head around that. Phones, cameras and organizers/PDA's were all separate devices and yes there was a time I carried all three. :-) To me when my phone got it's first camera, it was a play thing, something to take simple pictures. My point and shoot or SLR were still necessities.
All of a sudden my wife's iPhone 4S takes better pictures than my point and shoot! People start asking her what brand of camera she's using for her awesome pictures! Granted, she's a great photographer, but I felt we'd crossed a threshold. Camera's on phones were no longer toys, just like when digital camera's started taking seriously good photos. I had a photography professor who brought a digital camera image into class. It was about 1990. The image had huge pixels and hardly looked like him, but he told us that some day digital would take over.
When I started working on this VDI stuff I had an epiphany, I wanted my phone to be my computer! I know there are apps that can run your desktop through your phone, but that's not what I want. I want my computer to be my phone, camera, PDA, everything! In '95 I couldn't fathom my friends OmniGo would morph into a device that could make phone AND video calls, text messages, play video games, take great pictures, why can't it also be my computer? Now granted, I'd want a docking station that would allow me to use a monitor, keyboard, mouse, etc. and with VDI technologies I would be able to check out my work image on my phone, check it back in at the end of the day or check it out if I'm traveling.
I've heard there are some phones that can do this, but I'm waiting for that threshold line to be crossed. Where you say, "WOW, what just happened?!" And I don't think it's too far away. :-)
Until Next Time!
Windows 7 Optimization Guides for VDI - View and XenDesktop
Hi All,
Not sure if you've found these or not, but VMware and Citrix have brilliant guides to help you configure your Windows 7 golden image. View's is called the VMware View Optimization Guide for Windows 7 and is available on the VMware site. It lists out a number of great optimizations when running Windows 7 in a VDI world. The coolest thing is that you can change the settings manually or they have a script attached to the file that you can run and it will automagically update the gold image for you!
Citrix's document is called Windows 7 Optimization Guide For Desktop Virtualization. It doesn't have a super cool script attached to it, but it does list out all of the settings they recommend for Windows 7 running on XenDesktop.
Remember some of the most common reasons VDI implementations fail is the company tried to run their VDI environment like their physical environment. Little things that were no trouble in the physical world can be amplified and cause havoc in the virtual world.
Neil
Wednesday, February 13, 2013
Disk Shelves, RAID Groups, Aggregates and Volumes... Oh My!
Hi All,
Since NetApp does things a bit differently the concepts you might be familiar with traditional storage might be a little confusing when you begin to use your new NetApp controller. So you've given everything an IP address it's available on the network, it's time to open up System Manager!
Aggr0 will have already been created and that's where ONTAP lives. It's best practice to leave that guy alone, so the first thing you'll need to do is create your data aggregate. So what's an aggregate? It's just a bunch of disks chosen to go into a container. When you create the aggregate you need to tell ONTAP what your RAID group size will be. Now here's where it gets a little confusing. When I first started working on this technology, I thought, "What is this number?", "How do I get it?", "Does my RAID group size and Aggregate have to be the same number?". The best thing is to follow the recommendations of System Manager, which is usually 16. The ONTAP engineers have done a lot of calculations on how to properly balance out load as capacity is added, but if you're unsure give your account manager a call, they'll help you set the best RAID group size for your environment.
Basically, RAID group size, is the number of data drives plus the number of parity drives, that's it. So you can have more than 16 drives in an aggregate, it's a best practice to make that data aggregate as big as you can since you'll be using more drives to stripe your data to. So what happens if you create an aggregate of 20 drives and have a RAID group size of 16? 16 drives will be data drives and 4 drives will be parity if you use RAID-DP, which is another best practice. Still a little fuzzy? Take a look at the drawing below.
Hopefully that helps clear up some of the confusion around RAID group size. If not, let me know, I'll spend more time on it. So you've created your aggregate, now what? Next you'll create your Flex-Vol.. This is where all the magic happens and this is where you'll be spending most of your time. Aggregates can grow and Flex-Vols can grow and shrink on the fly! I won't talk much about LUNs and qtrees, but they fit inside Flex-Vols.
So there's a quick overview of some NetApp 101. I hope it was helpful.
Until Next Time!
Wednesday, February 6, 2013
Didja Know? - VSC for Non-Persistent Desktops
Ahoy Ahoy!
Yesterday I talked about using NetApp clones for persistent desktops and I didn't mention a valuable feature in VSC because it really doesn't fit in with persistent clones. But what if you're not set on persistent and you do want non-persistent or some sort of hybrid between persistent and non-persistent? Want to use XenDesktop or View as the connection broker, but not as the cloning mechanism? Remember, one size does NOT fit all! While you've got VSC, why not try our Redeploy feature? If you want to update your non-persistent or semi-persistent clones with new patches, virus updates, applications, etc. this is an easy way to do it.
Yep, another cool feature built into VSC!
**WARNING** This feature will overwrite your existing clones with the golden image. All customizations and data saved to the clones will be GONE! Make sure this is what you want to do!
To get there, click on your home screen in vCenter and than click on the NetApp "N" under Solutions and Applications. You'll be presented with the NetApp tool and this is where you do most of your beginning work with the tool.
From the image you can see we have a lot of choice and I'll quickly go over some of the VSC goodness. Under Monitoring and Host Configuration you get some great metrics regarding ESXi and your NetApp controllers. This is also where you can apply NetApp best practices to your ESXi hosts.
Under Optimization and Migration you can fix miss-aligned clones! Lots more on this functionality, it deserves a post just for itself.
Backup and Recovery we've looked at before, and it will allow us to backup and restore datastores, machines and/or files.
Under Provisioning and Cloning you'll find the Redeploy feature. When you open it VSC will scan to see what virtual machine has been used as a baseline for other machines. Select your master image and click the Redeploy link at the top.
The next screen you'll be presented with virtual machines that have been deployed from your golden image. Select the machines you want to redeploy and click Next. Here we can see all of these virtual machines were created using the Windows7 Customization Specification, this will be important in just a second.
Select apply new settings if you want to use a new customization specification. If you're happy the customization specification, just select Use current settings and click Next.
On the next screen, make sure you're happy with everything and click Apply. The desktops will be redeployed and anything on them will be GONE, and they will exactly like the golden image accept they will retain their names, MAC addresses, etc.
So what about semi-persistent? With that you'll need some sort of profile tool. I've talked a little bit about this in the past and will be writing a blog about Liquidware Labs Profile Unity very soon! I know I'm repeating myself, but remember ALL customizations and data on those clones will be GONE, so you'll want to make sure any user data or profile settings have been saved using some sort of profile and data redirection.
Until Next Time!
Tuesday, February 5, 2013
Didja Know? - VSC for Full Clones into XenDesktop and View!
Ahoy!
Lately I've been talking with a bunch of folks that are dipping their toes in the VDI pool and they aren't quite ready to jump off the diving board. They have their non-persistent desktops strategy down pretty well, but they're not sure what to do with persistent/semi-persistent. I've got an earlier blog regarding profile management, and I've had a chance to play with Liquidware Labs Profile Unity and it is a VERY cool product. I'll save that for a full review coming soon!
So lots of folks want to go VDI for their power-users / knowledge-workers and they're planning on doing full persistent desktops on the first pass. Let me say, there's nothing wrong with that, but you will experience some of the headaches you're currently running into with your physical model. Patching, profile sizes, virus scanning, corrupt images, to name a few. One huge win is critical data will NO longer be on a laptop that can get lost! I'm sure we've all heard stories of a laptop getting stolen out of someone's car and now <<fill in the blank data>> is out on the street. Which can lead to legal ramifications, as well as the loss of consumer confidence.
So you want persistent desktops and you're not quite ready to dive into pvdisk or advanced profile software? How about using NetApp cloning and import the images into XenDesktop or View? But Neil, that's gotta be a horrendous procedure! No no my friends it's quite easy and built right into VSC for vSphere! If you haven't downloaded VSC for vSphere, please, give it a try. It's free! **(Edit 02/07/2013 - Regarding VSC for both VMware and XenServer - They are free to download, but do require specific licenses for some features.)** I know I love free stuff! Don't even get me started about shows, I'll be the guy with the biggest bag of free stuff! What about space you ask? All those persistent desktops HAVE to use up a lot of space, right? Nope, NetApp's got you covered. We use our FlexClone technology and ONLY the deltas take up space. How cool is that? You're getting machines with no space consumed (except deltas)!
So how do you do this? Keep reading.
After you've installed and set a controller to do your provisioning and cloning, right click on the golden image you want your users to use, select NetApp > Provisioning and Cloning > Create rapid clones. Select your storage controller, what ESXi machine or cluster these virtual desktops should be cloned to, whether the image should be thin, thick or the same provisioning as the source.
Now, here's where the magic happens!
Here you can select your connection broker. Currently we support VMware View and Citrix XenDesktop.
Here I've highlighted a bunch of things. The connection broker, number of processors, memory, number of clones, clone name, starting clone number, clone increment, power on, etc. You can really customize these guys however you want. Now what I've got the most emphasis on is the customization specification. I know I say this about everything, but this is the COOLEST feature! It's part of vSphere and allows you to customize your clones however you want. Add them into AD, give them names, networking etc. Create this before hand and then we can call it from VSC.
If you choose XenDesktop, provide the connection name or the site name in XenDesktop and the domain these desktops will be part of. The desktops will get created and you can import them into XenDesktop in two ways. A .CSV file will be created and placed on the machine VSC is installed on. Take this .CSV file and put it on your XenDesktop machine or a share it can access. Tell XenDesktop you've got existing machines you want to import and that you have a .CSV file. Or, you can browse for them and import them from vSphere.
If you choose to import them into View, you'll see this menu. Enter in the View credentials, whether this will be a new or existing pool, the number pools, names and if they will be dedicated or floating. After the desktops are created they'll be pulled into View. It's actually quite neat to watch, you'll see them come into View and listed as un-registered. As the customization specification runs they'll start go through a metamorphoses and will soon be useable desktops with their own identity!
So you've put these desktops on an NFS share and have thin provisioned them. Awesome! But what happens as those desktops start to use space and delete it? The luster of thin provisioning goes away because we don't know what's going on inside of NTFS. All we know is that the clean blocks are now dirty. So the VSC engineers came up with something truly awesome called Reclaim Space. It reads NTFS and looks for white space and after it finds it, it punches the space out giving you back free space! If you right click on one of your desktops, it's under NetApp > Provisioning and Cloning > Reclaim Space.
I think this is a great way to make the first hop into persistent/semi-persistent desktops, especially if you don't have the time or financial commitment yet.
Until Next Time!
Monday, February 4, 2013
Test Environment Not Cooperating - Consolation Prize!
Hi Folks,
I was writing a cool blog about NetApp created persistent desktops imported into XenDesktop and View, but my environment is a little unhappy and I want to show you screen shots. So as a consolation prize I'm posting a couple of photos of me and the wife. One at the PEZ museum next to the world's largest PEZ dispenser and the other with us next to the worlds largest artichoke, well at least what we believe is the world's largest. What does this have to do with VDI or virtualization? Absolutely nothing! I just thought it would be fun :-) I'll have the VDI article up tomorrow.
Friday, February 1, 2013
Beta Program - VSC 2.0 for Citrix XenServer
Hi All,
If you attended one of my VDI classes at Citrix Synergy or attended one of my executive briefings you've probably heard me talk about VSC. If this is the first time you've heard of VSC I'm delighted to talk to you about it. VSC is NetApp's Virtual Storage Console, we have one for vSphere and one for XenServer. Both are FREE **(Edit 02/07/2013 - Regarding VSC for both VMware and XenServer - They are free to download, but do require specific licenses for some features.)** plugins that you can download now from http://support.netapp.com website. What's so cool about them? They're plugins that interact with vSphere and XenServer and give you storage management capabilities right inside of the hypervisor tool! Provision storage, deduplicate, rapidly clone thousands of machines, are just a few of the cool things you can do.
VSC for vSphere is a bit more mature and has more features, but VSC for XenServer is quickly catching up and we've got a Beta program we'd like YOU (yes you, in the back row talking to your neighbor) to help us test it out!
Beta Program - VSC 2.0 for Citrix XenServer
My product manager is eagerly waiting your emails! :-)
Here are a couple of links if you'd like to see both versions of VSC in action. The VSC for XenServer is the current 1.0 version, so hurry up and get that beta to see the 2.0 version!
For VSC for vSphere Nick has a bunch of great videos on Youtube, just search for "vsc netapp"
NetApp Virtual Storage Console (VSC) for VMware - Introduction
For VSC on XenServer 1.0, take a look at Rachel's great videos:
Citrix Synergy 2012 demo: NetApp VSC 1.0 for Citrix XenServer - SR management
Citrix Synergy 2012 Demo: NetApp VSC 1.0 for Citrix XenServer - VM cloning
Subscribe to:
Posts (Atom)