Monday, February 3, 2025

Pure Storage FlashArray File - So Easy, Even Neil Can Do it! - Part I - Setup an SMB and NFS Share

Hi Friends,

It's that time again, So Easy, Even Neil Can Do it!!  As I told you the other day, I'm at Pure Storage now and I'm heads down learning all this great technology.  What's really cool is Pure has two lines of storage for two different purposes, but they BOTH use SSD storage!  

SSD storage is SUPER fast because there's no moving parts.  If you've used computers for awhile, one of the worst sounds you'll hear is a hard drive bearings going bad or if the heads make contact with the platters.  It's not pleasant.


See that line on the platter?  That's bad!  The read/write heads on this hard drive have decided to go platter surfing and that platter is pretty much toast.  I've seen videos where repair techs will open a bad hard drive, remove the scratched platter and bad head, seal up the drive and it sometimes works.  But the data on that particular platter is pretty much toasted for us mere mortals.  Remember when your little sister or brother scratched up your favorite record/CD/DVD and it just never played right again?  Yep, it's kind of like that.

You've probably heard of SSD's since most modern laptops are coming with them.  Notice how fast your laptop boots now?  Remember when you used to turn it on, go to the rest room, go get a cup of coffee, go to a couple of meetings and when you get back your computer is ready to use!

With Pure Storage, there's no more of that, it's all pure SSD goodness!  I'll go into a lot more detail on what an SSD is and what is the Pure approach to SSD performance and longevity in another article.

Pure has two storage lines, FlashArray and FlashBlade.

FlashArray is for scale up.  What is scale up?  That's more traditional storage that you're probably more familiar with.  Fiber channel, iSCSI, file, block, transactional DBs and it's super fast!  Here you've usually got two heads and if one head croaks, the other head takes over.

FlashBlade is for scale out.  What's the difference?  Scale out is traditionally for high performance computing (big data), oil and gas data crunching, object stores, unstructured data, etc.  Here you usually have multiple heads with multiple drives and all the data is spread over all the different arrays to help speed up the number crunching and data retrieval.

I've been spending some time with FlashArray and it's super simple to set up file access for SMB and NFS all from the same GUI AND both Linux/Unix hosts using NFS can access the same SMB shares that Windows boxes are using, AMAZING!  Literally with a few clicks and some information, you can be serving files and filesystems to your customers.  Oh and did I mention how crazy fast the array is??

Remember the fun of setting up Samba?  Well no more!  Watch how cool this is!

1. Add your array to Active Directory so it can start authenticating users.  If you're not an AD shop and you'd like to use LDAP, you can do that too, but for this example I'm using AD.


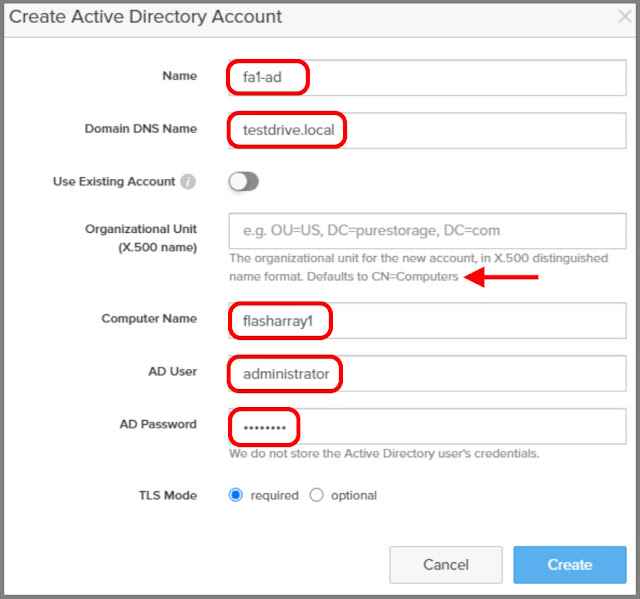
2.  Let's connect up to AD:
     Name - That's just what you want to call this connection.
     Domain DNS Name - This is the domain's name and you can get this from AD.
     Computer Name - Enter in the name of your FlashArray.
     User - This is the local administrative user for the FlashArray.
     Password - Put in the password for this user.

Click on Create and you're connected to AD. 

Note:  I didn't put anything in for my OU.  If you don't put anything in, you'll be defaulted into the CN= Computers group.


3.  Next we'll setup our File Systems for SMB and NFS.  This is super simple and you just need to follow 1-4.  Directory Quotas are not necessary, but they really do help keep your users from abusing the space you give them.  Let's go through each step together!


4.  Give your new File System(s) a name.


5. Notice a Directory was created when we created our File System?  That's the root filesystem.  We can use this if we want, but it's a best practice to create sub-directories to better organize your data repositories.


6.  Let's create our sub-directory by clicking on the + sign.  For File System, we'll select the file system we just created.  Give the sub-directory a name and a path that makes sense to you.


7. Now we'll export our share.  Select the directory you just created and give this new export a name.  Here's where you get a bunch of granular control.  You can either use the simple NFS and SMB default policies, or you can create your own.  I'm going to use the default policies for now.  

Something really important to remember.  Don't forget to Enable the share.  If you'd like to disable it at any time, it's as simple as flipping the switch.


8.  And that's really it!  If you want more granular control, you can setup quotas and specific policies, which I'll do at a later time.  But for now, let's connect to our share!

9.  Go to your Windows icon in the lower left corner of your screen and click it.  In the search bar type in two backslashes and the IP address of your Data VIF.  You can get your Data VIF from Settings > Network > Connectors.


10.  Linux would be just as simple except you need to mount the new NFS share with the mount command:
sudo mount -t nfs x.x.x.x:/directory1 /mnt/directory1

That's it!  Start using your share!!


***IMPORTANT INFORMATION***
I wanted to point out a few gotchas that are easy to overlook when you're setting up your share.

1.  Make sure your File Interface, Physical or VIF,  is Enabled.  -  It's very simple to over look this.  Spend a little time getting to know your connections and your networking.


2. Make sure your Directory Exports are Enabled.


3.  Make sure your Policies are Enabled.


4.  Make sure the Export itself is Enabled.  We did this back in step 7, but it's still an easy on to overlook.


Hope you enjoyed my first - So Easy Neil Can Do it with Pure Storage FlashArray!  Be on the lookout for additional blogs!

Neil

Wednesday, January 29, 2025

Neil's Now with Pure Storage and NTLM vs. Kerberos

Hi Friends,

Big update!  I'm now with Pure Storage!  I'll be focusing on FlashArray and FlashBlade File protocol.  I'm super excited and already wrote a blog for you!

I've been researching Active Directory authentication methods and I heard that NTLMv2 is being deprecated by Microsoft.  I thought I'd do a little research around what NTLM is and why you should probably migrate to Kerberos.  Hope you enjoy!


Kerberos vs. NT LAN Manager - Battle of the Windows Authentication Protocols

Data security, we all hear about it, we’ve all had to take training on it and our IT departments are constantly sending us phish to reinforce that if you’re connected to the Internet, you’re vulnerable to a threat actor attacks.

With that said, ever hear of Windows NT LAN Manager?  Windows New Technology LAN Manager or NTLM was first introduced in 1993 as part of Windows NT 3.1.  The successor, NTLMv2 was released in 1996 in Windows NT 4.0 Service Pack 4 (SP4).  NTLM and its second version is a suite of security protocols created by Microsoft to authenticate users’ identity.


How does it work?  Typically it’s follows these 8 steps:

  1. The user shares their username, password and domain name with the client.
  2. The client develops a scrambled version of the password, or hash, and deletes the full password.
  3. The client passes a plain text version of the username to the relevant server.
  4. The server replies to the client with a challenge, which is a 16-byte random number.
  5. In response, the client sends the challenge encrypted by the hash of the user’s password.
  6. The server then sends the challenge, response and username to the domain controller (DC).
  7. The DC retrieves the user’s password from the database and uses it to encrypt the challenge.
  8. The DC then compares the encrypted challenge and client response. If these two pieces match, then the user is authenticated and access is granted.

Sounds pretty solid, so why is Microsoft replacing it with a new protocol?  Well, NTLM has several known security vulnerabilities related to password hashing and salting.  With NTLM, passwords stored on the server and domain controller are not “salted”, meaning that a random string of characters is not added to the hashed password to protect it from cracking techniques.

This means that threat actors who possess a password hash do not need the underlying password to authenticate a session. As a result, systems are vulnerable to brute force attacks, which is when an attacker attempts to crack a password through multiple log-in attempts. If the user selects a weak or common password, they are especially susceptible to such tactics.

NTLM’s cryptography also fails to take advantage of new advances in algorithms and encryption that significantly enhance security capabilities.

Why Kerberos?

Kerberos, named for the three headed Greek underworld guard dog, was first introduced in 1983 and has steadily been upgraded through the years, and follows this security method:

  1. A client seeking authentication.
  2. A server the client wants to access.
  3. The ticketing service or key distribution center (KDC).

Unlike NTLM’s 8 step process, Kerberos uses 12 steps for security authentication:

  1. The user shares their username, password, and domain name with the client.
  2. The client assembles a package, or an authenticator, which contains all relevant information about the client, including the user name, date and time. All information contained in the authenticator, aside from the user name, is encrypted with the user’s password.
  3. The client sends the encrypted authenticator to the KDC.
  4. The KDC checks the user name to establish the identity of the client. The KDC then checks the AD database for the user’s password. It then attempts to decrypt the authenticator with the password. If the KDC is able to decrypt the authenticator, the identity of the client is verified.
  5. Once the identity of the client is verified, the KDC creates a ticket or session key, which is also encrypted and sent to the client.
  6. The ticket or session key is stored in the client’s Kerberos tray; the ticket can be used to access the server for a set time period, which is typically 8 hours.
  7. If the client needs to access another server, it sends the original ticket to the KDC along with a request to access the new resource.
  8. The KDC decrypts the ticket with its key. (The client does not need to authenticate the user because the KDC can use the ticket to verify that the user’s identity has been confirmed previously).
  9. The KDC generates an updated ticket or session key for the client to access the new shared resource. This ticket is also encrypted by the server’s key. The KDC then sends this ticket to the client.
  10. The client saves this new session key in its Kerberos tray, and sends a copy to the server.
  11. The server uses its own password to decrypt the ticket.
  12. If the server successfully decrypts the session key, then the ticket is legitimate. The server will then open the ticket and review the access control list (ACL) to determine if the client has the necessary permission to access the resource.

In a nut shell, why is Kerberos better than NTLM?

Microsoft has said that as of July 2024 that NTLM is deprecated and no further development will be made to it.  It’s not clear when Microsoft will remove NTLM support from Windows, but the message is clear, time to move to a more secure authentication protocol, like Kerberos.

Kerberos advantages:

  1. More secure: No password stored locally or sent over the net.
  2. Best performance: improved performance over NTLM authentication.
  3. Delegation support: Servers can impersonate clients and use the client's security context to access a resource.
  4. Simpler trust management: Avoids the need to have p2p trust relationships on multiple domain environments.
  5. Supports MFA (Multi Factor Authentication)

Three big disadvantages of NTLM are:

  1. Single Authentication - NTLM is a single authentication method. It relies on a challenge-response protocol to establish the user. It does not support multifactor authentication (MFA), which is the process of using two or more pieces of information to confirm the identity of the user.
  2. Security Vulnerabilities - The use of password hashing makes NTLM systems vulnerable to several modes of attacks, including pass-the-hash and brute-force attacks.
  3. Outdated Cryptology - NTLM does not leverage the latest advances in algorithmic thinking or encryption to make passwords more secure.

NTLM has been leveraged in cyberattacks known as NTLM Relay attacks, where Windows domain controllers are taken over by forcing them to authenticate malicious servers.  Password hashes can be stolen and used in a pass-the-hash attacks using stolen passwords from phishing or stolen Active Directory databases.

Recent NTLM Attacks:

  1. New Windows zero-day exposes NTLM credentials, gets unofficial patch
  2. Microsoft patches Windows zero-day exploited in attacks on Ukraine
  3. New Windows Themes zero-day gets free, unofficial patches
  4. Exploit released for new Windows Server "WinReg" NTLM Relay attack
  5. Microsoft discloses unpatched Office flaw that exposes NTLM hashes
  6. Microsoft fixes Windows Server bug causing crashes, NTLM auth failures
  7. Hackers steal Windows NTLM authentication hashes in phishing attacks

Resources:

  1. https://learn.microsoft.com/en-us/windows/whats-new/deprecated-features
  2. https://www.bleepingcomputer.com/news/microsoft/microsoft-deprecates-windows-ntlm-authentication-protocol/
  3. https://www.crowdstrike.com/en-us/cybersecurity-101/identity-protection/windows-ntlm/
  4. https://answers.microsoft.com/en-us/msoffice/forum/all/ntlm-vs-kerberos/d8b139bf-6b5a-4a53-9a00-bb75d4e219eb

Sunday, November 10, 2024

3D Printed Magnetic Gearbox (gear train)

Hi Friends,

You have to take a look at this really cool 3d printed magnetic gearbox (gear train) I recently printed.  I created a video on how it works.  What is so cool about it you ask?  The magnets and carbon steel bolts create valleys instead of teeth.  Besides it being really neat to fidget with, the gears won't chip or break if something gets stuck in them and will harmlessly skip to the next valley until the blockage is cleared.

You can download the files from Thingivese here.


Thursday, November 7, 2024

I'm On YouTube Now!

Hi All,

Check it out, I'm on YouTube now!

Video One is a 3D printed tourbillon I made.  All plastic except two wooden dowls from a toothpick.  :-)


Video Two is a 3D printed gear box that I made.  This is super cool, it uses magnets and bolts as the gears.  This way no teeth are touching and it can be used when physical meshing of gears is not possible.


Hope you enjoy!

Neil

Wednesday, November 6, 2024

Make Sure Your Belts Are Adjusted!!

Hi Friends,

Building my Prusa i3 MKS3 from the kit has given me a new perspective on how precise these printers are.  I did a bunch of printing and I noticed the prints were starting to get squished on the edges.


Its not the best picture, but you can see the extruder head is definitely hitting the print and if I took a side picture you'd see it was very smooshed.

Time to check the belt tension!!

Sure enough, both my Y and my X belts were loose.

Prusa has a whole page dedicated to this, but here's some quick tips.

For the X-Belt

1.  Loosen these three screws, the bottom right screw acts as a pivot to tighten or loosen the x belt in small increments.


2. Either loosen or tighten this hidden screw, marked with the purple arrow.  My x belt was loose, so I needed to tighten the screw (clockwise).  Righty-Tighty, Lefty-Loosie.  :-)


3. I noticed when I got the right tension and tightened the three screws again, the belt was too tight.  So I loosened the three screws again and loosened the hidden screw just a bit.  Tightened the three screws again and the tension was perfect on X.


For the Y Belt

Note:  I needed to flip my printer on it's side, be very careful!

1.  Loosen the screw on the bottom holding the belt to the bed.


2.  Tighten or loosen the screw shown.  In my case I needed to tighten it.


3. Check the tension with the Prusa app and when it's good, tighten the bed screw again.


After adjusting the belts, no more squishing!

Neil

3D Printing is SOOOO Cool!

Hi Friends,

I want to (re)introduce you to a new old hobby of mine 3D Printing.  For those that know me, know that I've been doing this for about 10 years now and I just found a old blog of mine!  

3D Printing is Awesome!

Do I still feel the same?  

In 10 years 3D printing has changed a lot!!  Printers have gotten cheaper, faster and the print quality is so good now.  I decided to take the plunge and I got a Prusa i3 MK3S.  Believe it or not I got the kit and built it myself!  The kit comes in a big box full of boxes and it was a bit intimidating.  I should have taken pictures, but I'm stupid.

I took it in steps and tried not to build the entire thing all at once.  Remember you can purchase a fully built version from Prusa, but I'm insane and apparently like a challenge.

I built the chassis first, then the "hot-end" and finally put it all together with the belts and all.  Prusa has a fantastic manual and they even include gummy bears too keep you going!

Why did I get the MK3S and not the MK4S?  That's a great question.  Truth is I purchased the printer and life just got in the way and it sat for a bit.  No other excuses except I wasn't ready for the challenge and when I finally got off my back-side I realized I was a generation behind already.  That's technology for you.

Don't get me wrong, the MK3S is an absolute beast and a workhorse and I've been able to print some amazing things with this printer, but it's not latest and greatest and that's okay for now.

Belt tension is always a bit of science-fiction and you'll find every recommendation known to, well everyone on the Internet.  Prusa takes the guess work out of belt tension with their Prusa Belt Tuner.  You pick your printer and pluck the belt and the app tells you if it's too tight or too loose.  BIG help!!

I've got lots to say, but wanted to show you some of the things I've created.  I've also gotten into CAD drawing for 3D printing using Onshape.  Here are two of my creations:

1. Happy Face Keychain

2. Lucet

If you have a 3D printer, you can print them out now!


The happy face keychain is pretty obvious, but what's a lucet you ask?  A lucet is a tool from the Viking and Medieval days that helped you braid things like rope, cord, etc.

Here's a link to wiki:
https://en.wikipedia.org/wiki/Lucet

I made a bunch of different versions and this seems to be the easiest to start making rope right away.

Check them out and let me know what you think!

Neil

Tuesday, April 16, 2024

Me and ChromaDB a Series! - How Do I Backup and Restore ChromaDB?

Hi Friends,

Thanks for continuing to go with me on my ChromaDB journey.  

If you haven't had a chance to read the first two parts, here they are:

Me and ChromaDB - A Series Maybe... Part One - A.I. is Your Friend!

Today I've got a great topic that started me on this ChromaDB, AI, LLM, Vector database journey.  How do I backup and restore my AI database?

Humans are funny, we leap before we look and it tends to get us into trouble.  Case in point, new application technology.  I love it, you love it, we all love new toys!  Think of backup and recovery as the batteries for your new toy.  A lot of times we're so excited about the new toy we forget the boring essentials like batteries.


Unfortunately backup and recovery is often seen as a boring essential, until the data is needed and then you're the most important person in the world.  

Inevitably a test application becomes production over night and now it's your responsibility to protect that data.

So let's get ahead of the curve with this new application data and figure out how to backup and recover your new application before it becomes production!

With ChromaDB you have a few options, you can:

1. Run memory resident.

2. Create a persistent data file.

3. Run in client/server mode.

I'm currently running my ChromaDB with persistence and writing to a data directory so if something happens all my data will be saved.  If you don't specify what type of relational database you want to use for persistence, ChromaDB will use SQLite >3.35 as the default database.

For my first test I wanted to try ChromaDB out of the box, so I used SQLite.  Make sure you create the filesystem first and when you let ChromaDB what client you're going to use, type:

persistentClient = chromadb.PersistentClient(path="/where_your_data_filesystem_is")

That's awesome, I've got my ChromaDB setup, it's persistent, I can query my data, but now what?  There are a bunch of different ways to backup your SQLite database, but if you have Veritas NetBackup it's SUPER simple to integrate this new technology into your enterprise backup and restore technology.

The cool thing about this is the SQLite agent is already built right into the NetBackup client software and has been since around 10.2.

Let me guide you through the process.

If you haven't downloaded and installed the Veritas NetBackup Client software on your ChromaDB box, you'll need to do that now.  You can download the Veritas software from HERE.

1. Log into the NetBackup WebUI and navigate to Protection > Policies and click on the +Add button.


2. There's going to be a lot of choices in the next section, but here's the ones I want you to focus on:
    Attributes:
    a. The name of the Policy.
    b. The Policy Type = DataStore
    c. Policy Storage = An active storage unit that you have available.


    Schedules:
    This schedule will look a little different from your Standard policy since we're going to initiate the 
    backup and restore from the CLI. 


    Clients:
    Let's add our ChromaDB database box as the client to our backup.  Click on the +Add button.


Enter the name of the ChromaDB machine's name.  I like to click on the "Detect client operating system".


   Backup Selections:
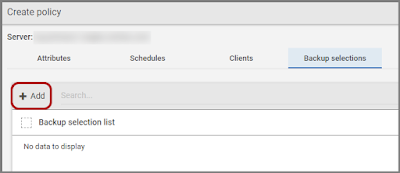
   Now we'll choose what we want backed up.  Click on the +Add button.


Select the persistent data path you chose earlier when you told ChromaDB what type of client you were using.


Alright we now have our policy to backup our ChromaDB SQLite database!

Let's kick off a backup from the CLI on the ChromaDB box.  

1. Log into your ChromaDB box where your database resides and navigate to:

/usr/openv/netbackup/bin

2.  Run the following command:
./nbsqlite -o backup -S nameofyourprimaryserver.com -P nameofyourpolicy -s Default-Application-Backup -z 10M -d /data/chroma.sqlite3

Let's break this down:
   -o backup tells NetBackup we're ready to do a backup
   -S put in the FQDN of your NetBackup Primary server.
   -P the name of the policy you just created. For me it is "chromadb2".
   -s this is the name of the schedule you're using.  I'm using the default one.
   -z here's some Linux magic here.  You don't need this setting for Windows, but for Linux you need to tell NetBackup how big you want your LVM snapshot to be.  You can set it in KB, MB or GB.
   -d point NetBackup to where your sqlite3 file is located.

Hit Enter and you should see this:
Backup initiated from XBSA ...
The SQLite database backup is in progress...
File backed up:  /SQLite/chroma.sqlite3
SQLite database backup is successful!
Completed the  backup  operation

Now back to the NetBackup WebUI!

Under the Activity Monitor check the status of the backup:


WOO HOO You've successfully backed up your ChromaDB SQLite database!


So let's say we want to do a restore, so we'll query to see what backup images are available to us:
1. Go back to the CLI of your ChromaDB box and navigate to:
/usr/openv/netbackup/bin

2. Type the following:
./nbsqlite -o query -S nameofyourprimaryserver.com -C thenameofyourchromadbbox -P chroma2

chromadb2
nameofyourchromabox
==================================================================================

==================================================================================
1713299663      Linux           SQLite            Tue Apr 16 15:34:23 2024
Completed the  query  operation


Check it out, we've got a backup that we can restore!

1. Go back to the CLI of your ChromaDB box and navigate to:
/usr/openv/netbackup/bin

2. Enter the following to restore:

 ./nbsqlite -o restore -S nameofyourprimaryserver.com -t /data/restore
  -o restore  tells NetBackup you'd like to do a restore.
  -S then give the name of your Primary NetBackup server.
  -t is the directory you want to restore the file to.

Restore initiated from XBSA
The SQLite database restore is in progress
File restored: /data/restore/chroma.sqlite3
SQLite database restore is successful!
Completed the  restore  operation

Let's go check out the NetBackup Activity Monitor to see how the job did there.

Looking good!  Let's go check out our /data/restore folder:


And there's our ChromaDB SQLite backup restored and ready to be used!

Hey that was fun wasn't it?!

Stay tuned for the next episode where I'm not sure what I'm going to do yet....

Friday, April 12, 2024

Brain's Favorite Gadgets of 2024 - So Far!

Hi Friends,

Even though I complained there were no good gadgets, I had to remind myself of some of the cool stuff that IS new and awesome.

1. Nintendo Switch

Where have you been all my life?!  I love the Nintendo Switch, it is an awesome game system.  I've always enjoyed portable handheld gadgets, from the Walkman to the Gameboy.  Something about having all your cool stuff with you at any time has always been appealing and the Nintendo Switch is the marriage of all the benefits of a big console in your hands!!  Oh yeah, did I mention it also has a touch screen too?  I know it's not new, in fact it's been out since 2017, but it's just so cool I had to be on the list.


2. Living AI EMO

This little guy is AWESOME!  If you haven't seen him yet you have to go check him out.  I've been a sucker for robots since I was a kid.  Something about a super smart buddy that wouldn't judge you, made you laugh, would protect you and would always be by your side sounded pretty cool as a kid.  EMO is a a desktop robot pet/friend.  He enjoys talking with you, wandering your desk, dancing, singing, playing music and pats to the head.  He's a pretty cool little dude!  Living AI even has a new robot coming out soon called Aibi.  I can't wait!!!


3.  Panic Playdate

This is a neat little game system, it's very clever and I've never seen anything like it.  It has the D-Pad and A & B, but also something very different, a crank.  The crank is another controller on the device and it makes games very unique.  Panic gives you a bunch of games when you get your system and even the way you get them is very clever.  You can even develop games for it and purchase games created by a pretty large online community.


Another robot friend!  This one is different from EMO.  Moxie is more of a confidant, a friend to chat with and go on story adventures with.  The way he communicates is simply amazing, you chat with Moxie very similarly to the way you'd chat with a friend.  Moxie spends a lot of time getting to know you and will ask you a lot of questions.  The really neat thing is you can ask him questions too about how he is doing.  He remembers too and will continue to grow the more you spend time with him.


Scratch is not new, it was released in 2007, but it is VERY cool!  It's a high level, block based programing language for younger kids developed by the MIT Media Lab.  I've always had trouble with programing and Scratch really makes it easy to just start making cool stuff like games!  I know I'm not the target audience for Scratch, but for someone that has always wanted to make games, but just didn't have the programing skills to do it, Scratch makes the impossible, possible!  Plus there are TONS and TONS of examples people have shared on the Scratch site.


Say what you will about them, but they're a really cool first step to augmented reality.  Trust me, I want the Oasis too, but unfortunately there's no James Halliday so we'll just have to wait a little longer for it.  I haven't tried these yet, but they look pretty cool and with everything Apple makes, it's just going to get better!


I love the story about this company.  It began as a student project back in 2021 and they're now on Gen4 of their robot!!  I have a Gen3 and a Gen4 and they are both really cute.  The company has done some great things and they've released new features and even accessories for their bots!


For those that know me, know I love watches too!  I've always been obsessed with mechanical watches and clocks and how some springs and cogs can tell time.  Swatch is a REALLY cool company because they create some very innovative affordable Swiss mechanical watches.  The Sistem 51 is super cool in that it is:
  1.  A Swiss mechanical/automatic watch at a good price.
  2.  The movement is made of only 51 parts.
  3.  Built 100% by machines.
  4.  Hermetically sealed so it never needs servicing.
  5.  A single screw holds the whole movement together.
  6.  90 hour power reserve!


That's it for now.  More to come!

*Update*
Wow, how could I forget ChatGPT?!  I've just hit the tip of the iceberg on understanding and working with Large Language Model (LLM) databases in my two part (so far) series on ChromaDB:
This is some really cool technology and as chips and networks get faster and storage becomes cheaper, Artificial Intelligence (AI) will have so much knowledge it will be mind blowing!  I spent some time talking with ChatGPT and it is truly amazing.  Are computers better at some tasks then humans?
Without a doubt!  Are there still things that humans do better than computers?  Absolutely!
My hope is that AI and humans will work better with each other, not compete against each other.


Thursday, April 11, 2024

Me and ChromaDB - A Series! Let's Create Our First Vector Database with Cosine Similarity

Hi Friends,

I got PIP to install!

I've been doing a bunch of research and wanted to give credit to some great blogs!!


Hasini Madushika's blog:

https://medium.com/@hasinivijayarathna/creating-a-vector-database-using-chroma-956b1d84aca3

Fantastic overview on how to setup your first ChromaDB and create a searcheable index of books and authors.


Michael Wornow's blog:

https://michaelwornow.net/2023/12/31/chromadb-demo

Great ChromadB overview with pros and cons as well as a great section on cosine similarity vs. distance.


Milana Shkhanukova's blog:

https://medium.com/@milana.shxanukova15/cosine-distance-and-cosine-similarity-a5da0e4d9ded

Fantastic job explaining in more detail what is cosine distance and how it's different from similarity.


Harrison Hoffman's blog:

https://realpython.com/chromadb-vector-database/

Another great blog on ChromaDB foundations as well as lots of information on vector similarity.


Who knew physics would actually be useful?!  Yeah yeah, Isaac Newton did in 1687.

Now let's get rolling!

1. Let's make sure Python3 is working:

#python3 -V

Python 3.10.12

WOOT!  And just to let you know, I'm using Ubuntu 22.04.2.

2. And to install the ever illusive PIP.

#sudo apt install python3-pip -y

#pip -V

pip 22.0.2 from /usr/lib/python3/dist-packages/pip (python 3.10)

ALRIGHT!

Now let's create a vector database!


1.  The first thing I'm going to do is create a place to store my data.

mkdir /data

I did all this in a bash shell, but you can create a Python script and run it in there too if you'd like.

2. Run Python so you can run the code.

#python3

3. Import ChromaDB into Python.

import chromadb

Now here comes the fun part.  Do you want your database to only run memory resident or do you want it to save some place?  Kinda depends on your needs, the space you have, etc.  But I don't want all my work to go poof, so I'm going to save it to disk.

4. Use this if you just want memory resident.

chroma_client = chromadb.Client()


OR


4. Use this if you want to save your database somewhere.

persistentClient = chromadb.PersistentClient(path="/data")

I'm going to save my data to filesystem called "data", but you can save your data anywhere you'd like.

What's really cool about this is ChromaDB saves this data into a SQLite3 database for you.  If you're having trouble with it, take a look at the troubleshooting section on the Chroma website.(https://docs.trychroma.com/troubleshooting).

5. This is the really cool part!  Next we're creating our collection.  Here we're going to give it a name and you'll notice a geometry and physics term you probably hoped would never haunt you again, COSINE!  What's going on here is we're telling the database to find words that have different vectors.  If the vectors are different, they probably mean the opposite.  If the vectors are facing the same directions, it's more likely they mean similar things.  In Michael Warnow's blog he shows you how to find the similarity instead of the difference if you want to do that instead.

books_collection = persistentClient.create_collection( name="books", 

       metadata={"hnsw:space": "cosine"}

)

6.  Next thing we do is add data to our books collection.  I'm going to use Hasini Madushika book collection because her book titles do a great job showing how the cosine feature works.  There's a lot going on here, but I think I'll break this down further in another blog about embeddings and such.


books_collection.add(

    documents=[

  "The Enigma Code", "Decoding Secrets", "Whispers of Intrigue", "Conundrums and Clues",

  "The Puzzle Master", "Mysterious Ciphers", "The Labyrinth of Enigmas", "Cryptic Chronicles",

  "Puzzled Minds", "Secrets Unveiled", "Echoes of Eternity", "Time's Embrace",

  "Chronicles of Eternity", "Eternal Moments", "Timeless Whispers", "Infinity's Tapestry",

  "Temporal Odyssey", "Endless Hours", "The Time Weaver", "Eternal Sands",

  "The Silent Symphony", "Whispers of Silence", "Silent Serenade", "The Sound of Quiet",

  "Quiet Harmony", "Harmony in Silence", "Muted Melodies", "Serenity's Echo",

  "The Tranquil Note", "Echoes of Quietude"

  ],

    metadatas=[{"author":"Alan Cipher", "price":"$19.99"},{"author":"Olivia Mystery", "price":"$18.95"},

{"author":"James Riddle", "price":"$21.50"},{"author":"Emma Puzzler", "price":"$22.99"},

{"author":"Alex Brainteaser", "price":"$20.75"},{"author":"Victoria Enigma", "price":"$23.45"},

{"author":"Samuel Conundrum", "price":"$24.80"},{"author":"Grace Enigma", "price":"$19.25"},

{"author":"Daniel Riddle", "price":"$17.99"},{"author":"Amanda Mystery", "price":"$21.00"},

{"author":"Robert Timeless", "price":"$25.50"},{"author":"Sarah Infinity", "price":"$26.75"},

{"author":"Michael Eternal", "price":"$24.99"},{"author":"Emily Timekeeper", "price":"$23.20"},

{"author":"Christopher Infinity", "price":"$22.45"},{"author":"Jessica Forever", "price":"$27.30"},

{"author":"Nicholas Timeless", "price":"$28.50"},{"author":"Laura Infinity", "price":"$26.00"},

{"author":"Benjamin Chronos", "price":"$24.95"},{"author":"Rachel Timebound", "price":"$25.75"},

{"author":"William Hush", "price":"$18.50"},{"author":"Sophia Mute", "price":"$17.75"},

{"author":"Oliver Quietude", "price":"$19.20"},{"author":"Isabella Hushington", "price":"$20.15"},

{"author":"Matthew Serene", "price":"$18.99"},{"author":"Emily Tranquil", "price":"$21.50"},

{"author":"Christopher Hushwell", "price":"$22.75"},{"author":"Grace Silentheart", "price":"$19.95"},

{"author":"Daniel Peaceful", "price":"$23.00"},{"author":"Victoria Hushed", "price":"$20.80"}

  ],

    ids=["id1", "id2", "id3", "id4", "id5", "id6", "id7", "id8", "id9", "id10", "id11", "id12", "id13", "id14", "id15", 

"id16", "id17", "id18", "id19", "id20", "id21", "id22", "id23", "id24", "id25", "id26", "id27", "id28", "id29", "id30"

  ]

)

7.  Now that we've got data in our database we can query it!

results = books_collection.query(

  query_texts=["Eternity", "Puzzle"],

  n_results=5

)

print(results)


{'ids': [['id11', 'id13', 'id14', 'id18', 'id20'], ['id5', 'id9', 'id1', 'id4', 'id19']], 'distances': [[0.33300162331174143, 0.378593976226286, 0.42385445272206546, 0.45082819934444696, 0.5292349798068949], [0.44286587397375554, 0.5532287339143328, 0.5986420831809907, 0.6688832557674483, 0.6887007582505835]], 'metadatas': [[{'author': 'Robert Timeless', 'price': '$25.50'}, {'author': 'Michael Eternal', 'price': '$24.99'}, {'author': 'Emily Timekeeper', 'price': '$23.20'}, {'author': 'Laura Infinity', 'price': '$26.00'}, {'author': 'Rachel Timebound', 'price': '$25.75'}], [{'author': 'Alex Brainteaser', 'price': '$20.75'}, {'author': 'Daniel Riddle', 'price': '$17.99'}, {'author': 'Alan Cipher', 'price': '$19.99'}, {'author': 'Emma Puzzler', 'price': '$22.99'}, {'author': 'Benjamin Chronos', 'price': '$24.95'}]], 'embeddings': None, 'documents': [['Echoes of Eternity', 'Chronicles of Eternity', 'Eternal Moments', 'Endless Hours', 'Eternal Sands'], ['The Puzzle Master', 'Puzzled Minds', 'The Enigma Code', 'Conundrums and Clues', 'The Time Weaver']], 'uris': None, 'data': None}


8.  Let's do a couple of other queries using our cosine vector.

print("results for 'Eternity':", results["documents"][0])

print("results for 'Puzzle':", results["documents"][1])


results for 'Eternity': ['Echoes of Eternity', 'Chronicles of Eternity', 'Eternal Moments', 'Endless Hours', 'Eternal Sands']

results for 'Puzzle': ['The Puzzle Master', 'Puzzled Minds', 'The Enigma Code', 'Conundrums and Clues', 'The Time Weaver']

This is really cool, notice the key words are Eternity and Puzzle.  The query find the exact word, but also words with a similar meaning.  They may not have the same magnitude, but isn't that cool?!?!

Until Next Time!

Neil