

Coming to you from the mind of Neil Glick (The Brain), a good old fashion, home cooked technical blog regarding storage, virtualization, security, and now cloud and backups! All Opinions Are My Own.
Tuesday, November 27, 2012
Monday, November 26, 2012
Citrix VDI with PvDisk and NetApp Best Practices - Part II.5 Site Replication
Hi All,
After I wrote the previous blog I realized I left out site replication for your VDI environment. I briefly mentioned that VSC for vSphere can kick off a SnapMirror between sites, but that isn't much help. Site recovery is a huge topic and I could go on for days, so I'll just talk about some basics. Rachel, myself and Trevor Mansell, from Citrix worked on a site replication and recovery paper, TR-3931. It uses Citrix XenDesktop, PVS, XenServer, NetScaler and NetApp SnapMirror, so it might not fit the technologies you're using in your environment, but there's a ton of great disaster recovery (DR) concepts that can be applied to the architecture of your DR scenario.
For example, you need to get your data to another site. In the past this was extremely painful using file based copying technologies which can be slow and usually require dedicated or extra bandwidth between sites. With NetApp SnapMirror, the data is transferred at the block level, only deltas are transferred and if you've deduped on your source side, you don't have to re-inflate the data, send it over and dedupe once again. This is a HUGE benefit!
So what do you copy over? This is going to depend on what you're failover site looks like, but my rule would be whatever you need to make your life easier without utilizing too much storage. DR is hard enough, make it as easy as you can and mirror everything you think you need, you can always tweak things after you've tested a failover.
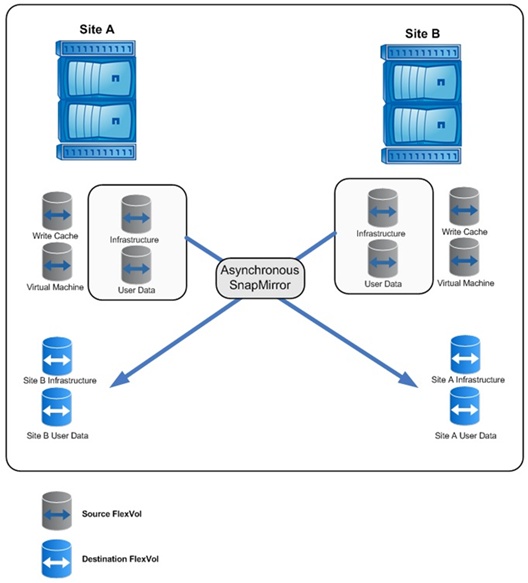
In the paper we have a pair of active/active sites, so we send Infrastructure and User Data, but leave the Write Cache and Virtual Machine. We leave the vDisk because we have a working copy of it at the other site. If you're architecture is active/passive, I'd copy over Infrastructure, User Data and Virtual Machine. Since the Write Cache is transient data, no need to copy it over.

After I wrote the previous blog I realized I left out site replication for your VDI environment. I briefly mentioned that VSC for vSphere can kick off a SnapMirror between sites, but that isn't much help. Site recovery is a huge topic and I could go on for days, so I'll just talk about some basics. Rachel, myself and Trevor Mansell, from Citrix worked on a site replication and recovery paper, TR-3931. It uses Citrix XenDesktop, PVS, XenServer, NetScaler and NetApp SnapMirror, so it might not fit the technologies you're using in your environment, but there's a ton of great disaster recovery (DR) concepts that can be applied to the architecture of your DR scenario.
For example, you need to get your data to another site. In the past this was extremely painful using file based copying technologies which can be slow and usually require dedicated or extra bandwidth between sites. With NetApp SnapMirror, the data is transferred at the block level, only deltas are transferred and if you've deduped on your source side, you don't have to re-inflate the data, send it over and dedupe once again. This is a HUGE benefit!
So what do you copy over? This is going to depend on what you're failover site looks like, but my rule would be whatever you need to make your life easier without utilizing too much storage. DR is hard enough, make it as easy as you can and mirror everything you think you need, you can always tweak things after you've tested a failover.
In the paper we have a pair of active/active sites, so we send Infrastructure and User Data, but leave the Write Cache and Virtual Machine. We leave the vDisk because we have a working copy of it at the other site. If you're architecture is active/passive, I'd copy over Infrastructure, User Data and Virtual Machine. Since the Write Cache is transient data, no need to copy it over.
The real fun begins at orchestration and that can be done with a variety of tools. In our paper we used the Citrix NetScaler, but if you're using vSphere, take a look at VMware Site Recovery Manager. (SRM). Or maybe you've used custom scripts? If you have and don't mind sharing them, please comment and include them, I'd love to take a look at them and it could save someone else a ton of time!
Bellow is an image from our paper that shows two active/active sites utilizing asynchronous SnapMirror to copy over required data for a failover.
As always, I hope this blog was helpful and look forward to Part III - Restore!
Tuesday, November 20, 2012
Citrix VDI with PvDisk and NetApp Best Practices - Part II
Hi All,
With Tiny Rider's help, here's part II and in today's blog I'm going to discuss how to backup your PvDisk in a VMware environment using the NetApp Virtual Storage Console (VSC) tool. I'll write a separate blog regarding XenServer, so today we'll focus on VMware as the hypervisor. I've probably said this before, but if you haven't seen or tried the VSC tool yet, you must download it and give it a try!
Please don't try this procedure on production desktops, try it on some test ones, and get comfortable with the technology and process before using it on production data. In other words, use at your own risk!
Now that we've got the warnings out of the way, let's back up some data! VSC allows you to backup data in various ways. You can backup a datastore, a single machine or multiple virtual machines in a datastore. For VDI I suggest you backup multiple machines from within the datastore. Why? In my opinion, this is the easiest way to backup multiple virtual machines at the same time with little interaction on your part.
How you backup and recover your data is going to depend on how you architected your virtual machine storage in XenDesktop at the host level. In my example my Virtual machine storage is on a datastore called writecache1 and my Personal vDisk storage has been separated and placed on a datastore called PvDisk.

Log into your vCenter server and click on the Home icon at the top of your screen.

Once there, under Solutions and Applications click the NetApp icon.

Click on the Backup and Recovery tab on the left side and click on the Backup link. Click the Add link in the upper right hand corner. From here you can do a lot of cool stuff. You can backup individual machines, multiple machines or entire datastores.

1. Give your backup a name and a description if you choose.
2. VSC can also kick off a SnapMirror if you already have a relationship set up between two volumes.
3. If you want you can perform a VMware consistency snapshot before the NetApp snapshot. I choose not to, which will make the VM crash consistent.
4. VERY important! If you have put your PvDisk on a different datastore from your virtual machine storage, click on Include datastores with independent disks. If you don't, your PvDisk will NOT be backed up and any customizations saved to it will be GONE! Click Next to continue.

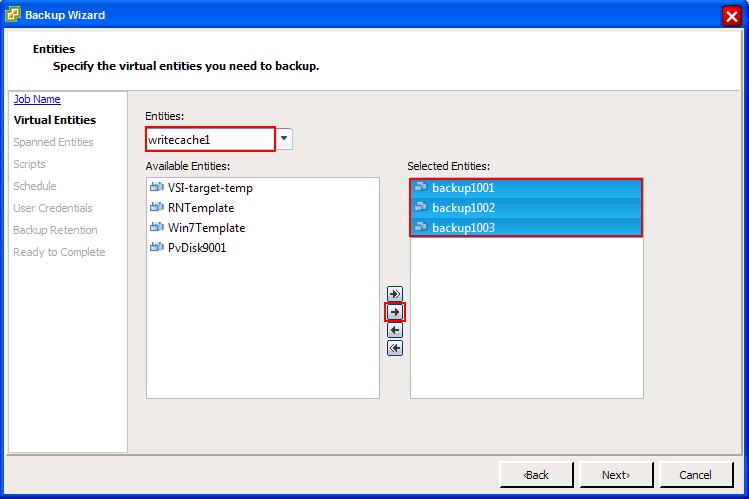
5. Select the Entities you want backed up. Here I choose writecache1 because this is the datastore my virtual machine storage is in and where my virtual machines are. Yours will be different and you can get this from the host configuration in XenDesktop.
6. Next select the virtual machines you want to backup and click the arrow to select them. Click Next to continue.

7. You should now see the datastores where your virtual machines live. Here I have PvDisk for my PvDisks and writecache1 which is everything else. Click Next.
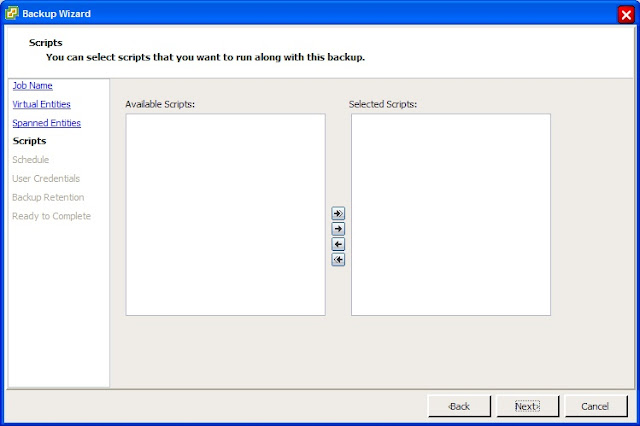
8. Here you can run any custom scripts you've created. Click Next to continue.

9. Now create a schedule for the backup. This will very on your needs. Here I will select One time only because I only want a single backup at this time. Click Next to continue.
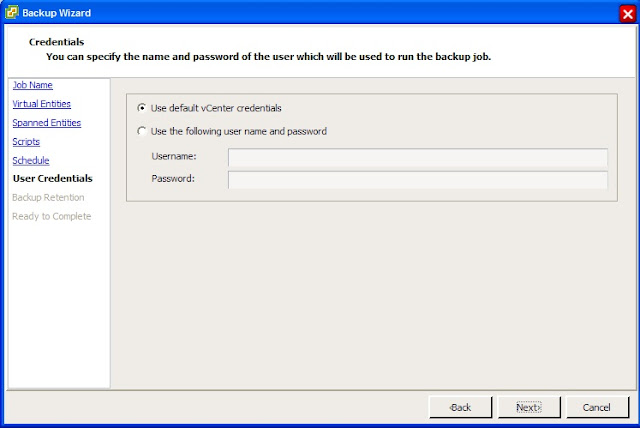
10. Enter the vCenter credentials you'd like VSC to use. Click Next.

11. Here we set the retention of the backup as well as email alerts regarding the backups. This will very greatly depending on your requirements. Click Next.

12. Review the backup job created and click Finish when you are satisfied. To run this job you can either check the Run Job Now or right click and run the job after it's been created.
Depending on the what you've selected for backup times, your VDI desktops will be backed up along with the PvDisk information. Look for restoring in Part III.
Until Next Time!
With Tiny Rider's help, here's part II and in today's blog I'm going to discuss how to backup your PvDisk in a VMware environment using the NetApp Virtual Storage Console (VSC) tool. I'll write a separate blog regarding XenServer, so today we'll focus on VMware as the hypervisor. I've probably said this before, but if you haven't seen or tried the VSC tool yet, you must download it and give it a try!
Please don't try this procedure on production desktops, try it on some test ones, and get comfortable with the technology and process before using it on production data. In other words, use at your own risk!
Now that we've got the warnings out of the way, let's back up some data! VSC allows you to backup data in various ways. You can backup a datastore, a single machine or multiple virtual machines in a datastore. For VDI I suggest you backup multiple machines from within the datastore. Why? In my opinion, this is the easiest way to backup multiple virtual machines at the same time with little interaction on your part.
How you backup and recover your data is going to depend on how you architected your virtual machine storage in XenDesktop at the host level. In my example my Virtual machine storage is on a datastore called writecache1 and my Personal vDisk storage has been separated and placed on a datastore called PvDisk.

Log into your vCenter server and click on the Home icon at the top of your screen.
Once there, under Solutions and Applications click the NetApp icon.
Click on the Backup and Recovery tab on the left side and click on the Backup link. Click the Add link in the upper right hand corner. From here you can do a lot of cool stuff. You can backup individual machines, multiple machines or entire datastores.

1. Give your backup a name and a description if you choose.
2. VSC can also kick off a SnapMirror if you already have a relationship set up between two volumes.
3. If you want you can perform a VMware consistency snapshot before the NetApp snapshot. I choose not to, which will make the VM crash consistent.
4. VERY important! If you have put your PvDisk on a different datastore from your virtual machine storage, click on Include datastores with independent disks. If you don't, your PvDisk will NOT be backed up and any customizations saved to it will be GONE! Click Next to continue.
5. Select the Entities you want backed up. Here I choose writecache1 because this is the datastore my virtual machine storage is in and where my virtual machines are. Yours will be different and you can get this from the host configuration in XenDesktop.
6. Next select the virtual machines you want to backup and click the arrow to select them. Click Next to continue.

7. You should now see the datastores where your virtual machines live. Here I have PvDisk for my PvDisks and writecache1 which is everything else. Click Next.

8. Here you can run any custom scripts you've created. Click Next to continue.

9. Now create a schedule for the backup. This will very on your needs. Here I will select One time only because I only want a single backup at this time. Click Next to continue.

10. Enter the vCenter credentials you'd like VSC to use. Click Next.

11. Here we set the retention of the backup as well as email alerts regarding the backups. This will very greatly depending on your requirements. Click Next.

12. Review the backup job created and click Finish when you are satisfied. To run this job you can either check the Run Job Now or right click and run the job after it's been created.
Depending on the what you've selected for backup times, your VDI desktops will be backed up along with the PvDisk information. Look for restoring in Part III.
Until Next Time!
Friday, November 16, 2012
The Continuing Adventures of Tiny Rider!
Tiny Rider heard I was falling behind on Part II and Part III of my blog, so he decided to help. I took this photo when he wasn't looking!


Citrix on NetApp Best Practices in Table Form!
Hi Everyone,
It's been a really busy week and I've only be able to do a little work on Part II, so I'm posting some best practices in easy to follow table form! Part II and Part III are coming soon! What we have here are different Citrix VDI components and best practices on how they interact with NetApp.
It's been a really busy week and I've only be able to do a little work on Part II, so I'm posting some best practices in easy to follow table form! Part II and Part III are coming soon! What we have here are different Citrix VDI components and best practices on how they interact with NetApp.
XenDesktop on vSphere
|
|
Storage Protocol
|
Backup Method
|
Compression / Thin Provision / Deduplication
|
|
Write Cache
|
NFS
|
N/A
|
Thin Provision
|
|
vDisk
|
CIFS
|
NetApp Snapshot
|
Thin Provision / Deduplication
|
|
Personal vDisk
|
NFS
|
Thin Provision / Deduplication
|
|
|
User Data
|
CIFS
|
NetApp Snapshot
|
Thin Provision / Deduplication / Compression
|
XenDesktop on XenServer
|
|
Storage Protocol
|
Backup Method
|
Compression / Thin Provision / Deduplication
|
|
Write Cache
|
NFS
|
N/A
|
Thin Provision
|
|
vDisk
|
CIFS
|
NetApp Snapshot
|
Thin Provision / Deduplication
|
|
Personal vDisk
|
NFS
|
Thin Provision / Deduplication
|
|
|
User Data
|
CIFS
|
NetApp Snapshot
|
Thin Provision / Deduplication / Compression
|
Friday, November 9, 2012
The Adventures of Tiny Rider!
Here we have a picture of my wife and I at the Arc de Triomphe. As I was taking the picture, the elusive Tiny Rider popped into the photo and quickly ran off!


Thursday, November 8, 2012
Citrix VDI with PvDisk and NetApp Best Practices - Part I
Hi All,
Welcome to a three part series regarding Citrix Streamed Desktops with Personal vDisk and NetApp best practices. Part I will consist of storage design considerations and best practices when creating steamed desktops with PvDisk. Part II will jump to best practices on backing up your new environment and Part III will discuss recovering individual files to a site failure.
From my previous blog post, you can tell I really like technologies like PvDisk, I feel they are what were missing in VDI implementations for folks that needed more persistency, but great VDI products are just one side of the coin. To make your new environment even better you need a good architecture and great storage. We all know that user's are a tricky bunch, if they feel their new environment is ANY slower or more problematic than what they currently have, they will complain and make your life very difficult. I can't promise your new VDI environment will be perfect, but I'll provide you with some of our latest storage best practices to help make it that much better!
Let's talk vDisk. In PVS, this is the long term memory of your VDI implementation. Everything your gold image is will be contained on your vDisk. Until recently NetApp recommended putting your vDisk on block storage, but with our support of SMB 2.1 we recommend putting it on a CIFS share. I've written about this in a previous blog so I won't spend much time on it. Go CIFS!
Write Cache is the short term memory of your VM. Anything the OS needs to do while it's running is stored on the write cache. We recommend putting the write cache on NFS and thin provision it. If you think about it, probably one of the largest consumers of storage will be your write cache. If you assign 10 gigs to each virtual machine, and multiply that times the number of virtual machines in your environment, you can see how quickly this can become a huge number! Thus the beauty of NFS and thin provisioning. Assign all of your desktops to the same write cache datastore or storage repository and they will only use what they need out of the shared bucket. Since it's all transient data, don't waste CPU cycles on deduplication or compression.
Hmmm, if vDisk is long term memory and Write Cache is short term, I guess your user profile will be your gray matter. :-) This gives your desktop it's personality. There are TONS of great products out there that do profile management, AppSense, Citrix, Liquidware Labs, RES, VMware, etc. My recommendation is to read the UEM Smackdown by Ruben Spruijt. It's an amazing paper and it will educate you tremendously on the current profile management softwares. Re-direct your users profiles to a CIFS share, set a backup and storage policy, sit back and relax! If you haven't used NetApp q-trees before, they're great for keeping users from eating too much storage. And we know users NEVER consume too much storage! To help keep storage consumption down, turn on deduplication and compression!
Which leaves us with PvDisk. I'm not sure what part of the brain this is, but I know it's cool! Like the write cache, put it on a shared NFS datastore or storage repository, set thin provisioning, deduplication, get a drink and put your feet up! Since your users will be installing applications here, don't use compression, it will put extra load on your storage. Keep an eye this since user's will be installing applications and probably putting their files there too. It can fill up very fast!
See you in Part II
Welcome to a three part series regarding Citrix Streamed Desktops with Personal vDisk and NetApp best practices. Part I will consist of storage design considerations and best practices when creating steamed desktops with PvDisk. Part II will jump to best practices on backing up your new environment and Part III will discuss recovering individual files to a site failure.
From my previous blog post, you can tell I really like technologies like PvDisk, I feel they are what were missing in VDI implementations for folks that needed more persistency, but great VDI products are just one side of the coin. To make your new environment even better you need a good architecture and great storage. We all know that user's are a tricky bunch, if they feel their new environment is ANY slower or more problematic than what they currently have, they will complain and make your life very difficult. I can't promise your new VDI environment will be perfect, but I'll provide you with some of our latest storage best practices to help make it that much better!
Let's talk vDisk. In PVS, this is the long term memory of your VDI implementation. Everything your gold image is will be contained on your vDisk. Until recently NetApp recommended putting your vDisk on block storage, but with our support of SMB 2.1 we recommend putting it on a CIFS share. I've written about this in a previous blog so I won't spend much time on it. Go CIFS!
Write Cache is the short term memory of your VM. Anything the OS needs to do while it's running is stored on the write cache. We recommend putting the write cache on NFS and thin provision it. If you think about it, probably one of the largest consumers of storage will be your write cache. If you assign 10 gigs to each virtual machine, and multiply that times the number of virtual machines in your environment, you can see how quickly this can become a huge number! Thus the beauty of NFS and thin provisioning. Assign all of your desktops to the same write cache datastore or storage repository and they will only use what they need out of the shared bucket. Since it's all transient data, don't waste CPU cycles on deduplication or compression.
Hmmm, if vDisk is long term memory and Write Cache is short term, I guess your user profile will be your gray matter. :-) This gives your desktop it's personality. There are TONS of great products out there that do profile management, AppSense, Citrix, Liquidware Labs, RES, VMware, etc. My recommendation is to read the UEM Smackdown by Ruben Spruijt. It's an amazing paper and it will educate you tremendously on the current profile management softwares. Re-direct your users profiles to a CIFS share, set a backup and storage policy, sit back and relax! If you haven't used NetApp q-trees before, they're great for keeping users from eating too much storage. And we know users NEVER consume too much storage! To help keep storage consumption down, turn on deduplication and compression!
Which leaves us with PvDisk. I'm not sure what part of the brain this is, but I know it's cool! Like the write cache, put it on a shared NFS datastore or storage repository, set thin provisioning, deduplication, get a drink and put your feet up! Since your users will be installing applications here, don't use compression, it will put extra load on your storage. Keep an eye this since user's will be installing applications and probably putting their files there too. It can fill up very fast!
 |
| Your Brain on Citrix Streamed Desktops with Personal vDisk |
See you in Part II
Tuesday, November 6, 2012
Page Hits
It's pretty funny. The picture of my wife's teddy bear in a NetApp outfit has the 2nd highest hit ratio. :-)
Monday, November 5, 2012
Why I LOVE PvDisk!
Hi All,
In today's topic I'd like to discuss why I love technologies like Citrix PvDisk. PvDisk is a new product from Citrix that I think REALLY raises the bar when it comes to VDI. For the most part non-persistent desktops are pretty easy to maintain. You create your master image, roll it out and users aren't allowed to change it. When you need to update the master image with patches or virus definitions, you just do it and all of the clients get the new master image. This is great for call centers, libraries, etc, but what about folks like myself who want to install stuff on their my laptop?
Non-persistent is great for patching, and keeping the desktops in sync, but not so good for customizations. Persistent is great for customizations, but not so good when it comes to keeping things in sync. Users have a nasty habit of installing what I call, "company tolerated", applications. For example, iTunes. It's not going to cause any harm, but will IT make it a standard application? Probably not. This is where PvDisk comes to the rescue!
With PvDisk you get a drive all to yourself, it's yours, all yours!!! The VDI administrators can make it any size they desire and it will survive in a non-persistent environment. How cool is that!?! So while my C:\ drive is updated with all the latest patches, virus definitions, etc., my P:\ drive remains consistent even after refreshes. So I can install my company tolerated applications and still have a non-persistent desktop. Best of both worlds!
So where does NetApp fit into all of this? I did some testing with NetApp deduplication and compression and they still work on the P:\ drive! What could be better? If you're installing applications, I don't recommend using compression on your P:\ drive though. So your users can install their apps on their P:\ drive and store files in their CIFS shares. Happy administrators and happy users!
Until Next Time!
Subscribe to:
Posts (Atom)