Thursday, May 30, 2013

Nimble Storage Setup - So Easy, Even *I* Can Do It! - Part IV

Hi Friends,

Welcome to the final episode of Nimble Storage Setup - So Easy, Even *I* Can Do It! - Part IV.  Last time we left our hero he'd just created a volume in the easy to use Nimble Storage GUI.  Today I'm going to take that volume and add it to an ESXi box that is being managed by VMware vCenter.

The first thing we need to do is set up a relationship between the Nimble Storage and the ESXi box.  Think of yourself as the matchmaker setting up a blind date.  Nimble Storage, meet ESXi.  ESXi, meet Nimble Storage.  And you as the matchmaker, if you don't make any typos, will be responsible for a wonderful match!

1.  Go into the Nimble Storage GUI, click on Manage and Initiator Groups.

 2.  We're going to create a new Initiator Group and add an initiator to the group.  Click on New Initiator Group.

 3.  Give the Initiator group a name and click on the Add Initiator button.


4.  Head over to vCenter to get the iSCSI iqn of the ESXi machine.  Click on the Configuration tab
and Storage Adapters link.  Highlight the iSCSI Software Adapter and copy the iSCSI Name.


5.  Head back to the Nimble Storage GUI and paste it into the Initiator Name.  After you click OK, you can add more initiators if you need to.


6.  I now have a new initiator group with one initiator in it.


7.  The Nimble array now knows about ESXi, but we need to introduce ESXi to Nimble.  Remember that Target Discovery IP Address we assigned in a previous blog?  Copy that guy down and let's head back to ESXi.


8.  Click on the Properties link under the details area for the iSCSI adapter.  There are a couple of tabs we need to provide data in.  First click on the Network Configuration tab and add the VMkernel Adapters that are on the same network as your iSCSI volumes that you want to use for data.


9.  Next click on the Dynamic Discovery tab.  Remember that IP address you copied down?  Put that here.  You're completing the introductions for the blind date and after a rescan the storage should be available for use.


10.  Next we'll add the storage and create a datastore so vCenter can use the new storage.  Click on the Configuration tab, on the Storage link and then Add Storage.


11.  Select Disk/LUN.


12.  If you have other iSCSI volumes on the same data network and they're not choosey when it comes to access, you might see more than your volume.  Be careful not to select a volume that's not yours.  Take a look at the Path ID and you'll see the name of the volume in it.  Here you can see "neil-test" in the Path ID, that's the volume we created.


13.  Choose either VMFS-5 or VMFS-3.


14.  Take a look at the Current Disk Layout.  If this is a brand new volume, there shouldn't be anything there.  Remember, be careful when you selected the volume not to use a volume that's not yours.


15.  Give the new datastore a name.


16.  Choose how much of the space you'd like this datastore to consume.  Here I'm using the maximum available.


17.  Review everything and make sure you're happy.  When you're happy click Finish.


18.  Hurray, you now have a new datastore to use!


I hope you enjoyed this series as much as I did writing it!  Always remember there are many different ways to get to the finish line, so my way is just *a* way, not the only way. :-)

Look for more blogs coming soon!

Until Next Time,
-Brain

Nimble Storage Setup - So Easy, Even *I* Can Do It! - Part I
Nimble Storage Setup - So Easy, Even *I* Can Do It! - Part III

Wednesday, May 29, 2013

Nimble Storage Setup - So Easy, Even *I* Can Do It! - Part III

Hi Friends,

Welcome to the next blog on Nimble Storage Setup - So Easy, Even *I* Can Do It! - Part III.  Today I'm going to show you how easy it is to create a volume and setup up snapshots to protect your new volume.

Yesterday I stopped at the password entry screen.  Once you've entered your password you'll come to the home screen which provides all kinds of great information and metrics.  Mine is pretty boring because I just set it up.


The cool thing is you'll notice, no RAID setup, it's already been setup and optimized for you!  Nimble Storage uses dual parity RAID, so you get the benefits of RAID 10 without the extra drives of RAID 10!

On to the volume creation!

1.  On the top of the screen you've got a bunch of choices, but we're going to click on Manage and then select Volumes.


 2.  Click on the New Volume button.


 3.  Give the volume a name.  Now I'd like to focus your attention to a couple of really cool features.  Take a look at Performance Policy.  What's that you ask?  Head to step 4.


 4.  Performance Policy is super cool especially to a VDI guy like me, since I'm always concerned about block size!  Here you can adjust the block size to what your application is using.  I can't get over how cool that is!  Take a look below.  Nimble gives you a bunch of pre-created options that are already optimized for certain applications.  Well, what if your application isn't on this list, or you want to select something special just for your application?  Step 5!  :-)


5.  You can select 4, 8, 16 or 32KB and you can specify if you want compression and/or caching turned on.  And if you don't want to have to mess with any of this you can just select "default".  As seen in step 3.


6.  Once you've selected your Performance Policy, you select your access controls.  The nice thing about this is you can be as selective or open as you want with permissions to your iSCSI volumes.  If you want every machine can have access or just certain machines or just one.  Very, pardon the pun, nimble.  Now select if you'd like to allow multiple initiator access.


7.  Select the size you'd like your volume to be and whether this volume is thin provisioned how much data can be put onto the volume, warnings, snapshot reserves and snapshot warnings.  This is personal preference, so experiment a bit to see what works best for you.


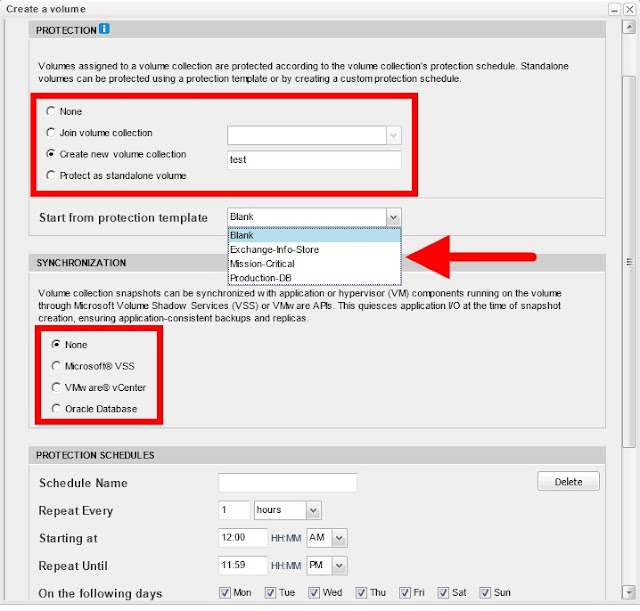
8.  Now we'll protect our volume.  If it's just a test and you don't care about snapshots, just select None, but if it is something you'd like to protect you have a few choices here.  If you've already created a volume collection group for protecting, you can assign it here.  If you'd like to create a new volume collection because you're going to be creating similar volumes or something like that, you can select create new volume collection.  If it's just a single volume that you'd like protected, go ahead and select protect as a standalone volume.  By creating volume collections, you can easily add new volumes to existing volume collections, but again, choose what works best for you.


9.  Here I'm selecting a new volume collection.  You can select pre-created protection templates or create your own.  The synchronization feature is really awesome.  For example, you can select VMware vCenter, put in your credentials and the array will work with vCenter to quiesce those virtual machines for you before a snapshot is created.  Makes sense right?  Why is this unbelievably cool?  If you've ever been in charge of backups you'll understand because the last thing a backup administrator wants to get is the error that some files/machines could not be backed up because there were files open!


10.  Next you'll create your schedule of backups, when, what time, how often and if you want to replicate those snapshots to another array.


11.  Click Finish and your volume is created!  Here I'm back at the Volumes page, you can see the neil-test volume has been created.


I not only enjoy how easy it is to create the volume, but also the choices I'm given.  If I want to just take defaults I can zoom through the process.  I can also be very particular and take my time customizing my volume exactly the way I want it.  Another extremely useful feature is the helpful tips displayed on the menus as you go along.  It's super easy and the tips put the icing on the cake by explaining what feature you're setting and how it works.

That's it for today friends.  Tomorrow I'll focus on iSCSI initiators and getting the newly created volume into ESXi.

Until Next Time!
-Brain

Nimble Storage Setup - So Easy, Even *I* Can Do It! - Part I
Nimble Storage Setup - So Easy, Even *I* Can Do It! - Part IV

Tuesday, May 28, 2013

Nimble Storage Setup - So Easy, Even *I* Can Do It! - Part II

Hi Friends,

Hope you had a great weekend!  I spent mine doing my favorite thing, being a slug.  Today's blog is Part II of Nimble Storage Setup - So Easy, Even *I* Can Do It!  In the last blog I showed you how to get the Nimble array on the network and I ended telling you the next blog would cover volume creation...  Well, I lied. :-)  Today's topic is setting up data networks, DNS, Time, and other good stuff.  Sorry about that, I'll get to volume creation soon!

Okay, enough groveling.  Now that you've got your Nimble array on your network, let's do some advanced setup steps!

1.  Open up an internet browser and type in the address you gave the management network for the Nimble array.  You'll be greeted by a Nimble Storage widow, enter in the password you gave the array.


2.  Now, choose how you'd like to setup your network.  Choose wisely....  Nah, just kidding, you can always change things later!


3.  First enter in the IP address you'd like to use iSCSI to discover all of your volumes on and the subnet mask.  For the other ports you've got lots of choices, but here I'm using a private network only for data.  If you want to use jumbo frames, here's where you set it.  Next give the array a couple of IP addresses for diagnostic purposes.


4.  Enter in the domain name your array will be part of and DNS servers to use.


5.  Select the time zone your array is in and the NTP server you'd like it to get it's time from.


6.  Let's talk support.  We've got a great group of people here waiting to help you out if you need it and your array has the ability to call home when it's not happy, let us help you!  In this screen you enter who's emailing, who receives the emails, what SMTP server, whether to use http proxy to send the emails and most importantly to send Nimble Support an email.


7.  That's it!  Now you're ready to start carving up storage.


I hope you enjoyed today's blog!  Tomorrow, hopefully, I'll be showing you how to carve up those volumes!

Until Next Time!
-Brain

Nimble Storage Setup - So Easy, Even *I* Can Do It! - Part I
Nimble Storage Setup - So Easy, Even *I* Can Do It! - Part III
Nimble Storage Setup - So Easy, Even *I* Can Do It! - Part IV

Friday, May 24, 2013

Nimble Storage Setup - So Easy, Even *I* Can Do It! - Part I

Hi Friends,

I'm back from my hiatus and ready to share some great new stuff with you!  Today I'm going to start a new series, Nimble Storage - So Easy, Even *I* Can Do It!  Today I'm going to show you how easy it is to get your Nimble array on your network.

So you got your brand new Nimble array, racked it and plugged in an ethernet cable into eth1 that you want to be your management network.  Now what?!

It's super easy you can go about it in a few ways.

1.  Hook up your PC with a serial cable and use the CLI to configure.
2.  Use a Keyboard Video Mouse console and use the CLI to configure.
3.  Use the Nimble Setup Manager tool and configure with a GUI from the comfort of your desk.

Now I don't know about you, but I'm lazy, don't like the noise of datacenters and have come to appreciate GUI's these days. :-)

Got your eth1 plugged into your management network?  Excellent!

Here's what you have to do.

1.  Download the Nimble Setup Manager from InfoSight.  What you haven't been to InfoSight?  You've gotta check it out!  This page will give you more information about what it is.  Once you're there, click on the InfoSight link at the top.


2.  Install on a Windows box on the same physical subnet as the management network you have plugged into eth1 on your array.  Also, make sure you have Adobe Flash Player and if this box doesn't have access to the internet, install Bonjour Print Services for Windows.  (Thanks Phil!)

3.  Launch Nimble Setup Manager and it will go find your new array!  How cool is that?


4.  Select the array you want to configure and click Next.
5.  Next you'll need to have some network information regarding that management network to give to your new array.

Here we enter in the Array Name, Management IP, Subnet Mask, Default Gateway and a password.


6.  Guess what?  You're done!  Well not done done, but now you can access your array from the management network to setup your volumes and all from the comfort of your cube.  Just go to a browser and enter in the IP address you gave the management network and you'll be able to do all your administration from the GUI.  Now if you're a CLI fan, never fear, you can SSH to that IP and configure from there as well!


Next time I'll show you how easy it is to create volumes and make them seen by ESXi.

Until Next Time Friends!
-Brain


Nimble Storage Setup - So Easy, Even *I* Can Do It! - Part II
Nimble Storage Setup - So Easy, Even *I* Can Do It! - Part III
Nimble Storage Setup - So Easy, Even *I* Can Do It! - Part IV

Sunday, May 19, 2013

Where's Neil?

Hi Friends,

Sorry, for not writing for awhile, I've been on a short hiatus.  Look for new and exciting blogs coming soon!

-Brain

Thursday, May 2, 2013

Random Ramblings of Neil - Why VDI?

Hi Friends,

Thought I'd try something new, the random ramblings of me.  If you've stuck with me this far, maybe you'll stick around a little longer.  I figured I'd start babbling about what's on my mind.  So why VDI?  I think a lot of folks are finding out that VDI is tough!  Server virtualization was fairly easy because servers are predictable, and unless they get viruses, they pretty much are content to do their jobs, day in, day out without much variation.

Now people on the other hand!  We're horrible, we don't work 24 hours a day, we don't stay on task, we take breaks, we go to websites that aren't business related, pick up viruses from naughty sites, we drop our computers, leave them in car to cook and potentially get stolen, download software our employers don't want us to, delete files on our computers we're not supposed to.  Wow, we're pretty chaotic!

I get the question a lot, why VDI?  It tends to be expensive, server administrators don't want it because they're afraid they'll be handed desktop support and the desktop administrators don't want it because they're afraid they'll lose their jobs to the server administrators.  With server virtualization it was all about consolidation and saving money and I don't think VDI is trying to solve that same problem.  Unfortunately a lot of folks immediately equate VDI with server virtualization and saving money and consolidating.

Maybe we're trying to solve a whole different problem, one that people forget about all the time.  Intellectual property, also known as YOU!  If you think about it, hardware is throw away, but people are invaluable!  What's trapped in our heads makes business successful.  So we need to architect a solution, not around the predictable server, but the chaotic human.  So how about some solutions!

1.  Let's get that data off a local disk and put it somewhere safe!  But Neil, I'm already running CIFS shares and have a utility that let's user's backup their desktop!  Ah, very good point, but take a poll of your users how many are actually running their backups and/or backing up to their CIFS share?  How many have gone to IT with a dead laptop hard drive and have lost everything?  How many have left their laptops in their car and it walked off?  Remember, once that data is gone it may not be gone.  If stolen, that data might show up in the wrong hands.  What about the damage to your companies reputation?  What if there was customer data on that laptop, like credit card numbers?

2.  Give the user what they need, not what you think they need and they'll love it!  One size does NOT fit all.  If your users can run their desktop on their tablet or ANY computer, they're going to like the solution!  If they accidentally delete OS files they're not supposed to and the OS crashes and a simple reboot will fix the problem automagically, they're going to like the solution!  So how do we know what the user needs?  I've mentioned it before, perform an assessment.  You may think your users only need 20 IOPS, maybe they do, maybe they don't.  What about block size?  What about reads vs. writes?  Remember, you're introducing something new to your users.  If it doesn't perform just as good or better than what they're used to, you'll never hear the end of it!  Do the users need to install applications or is a certain set good enough?  There's lots of great technologies out there.  My suggestion, figure out what your users need before you purchase anything.

I think VDI is cool.  Is it tough?  Yes, but it solves a lot of problems and can make your user's lives easier, IF done right.  In other ramblings I'll talk about what *I* think is right. :-)

Until Next Time!
-Brain