Friday, April 26, 2013

VAAI for Dummies - AKA VAAI for Me! - Part V - Statistics!

Happy Friday Friends!

In previous articles I showed you how to tell if VAAI functions were on, but how do you know if they're working?  A good way is to take a look at statistics from ESXtop on ESXi and from the controllers.  Let's first have a look at ESXtop.

To get there, log into one of your ESXi machines that will be performing the VAAI offloads:

1.  Type esxtop
2.  Type u
3.  Next you can select what you want ESXtop to display, so type f and then b, f, g, i and o.  This will remove b,f,g and i and add o to the list of what's monitored.
4.  Hit enter to return back to the statistics.
Sorry for the size of the image, I know it's hard to see.  If you click on it you'll get the original size.

 So what do the statistics mean?

1.  CLONE_RD - Number of full copy reads
2.  CLONE_WR - Number of full copy writes
3.  CLONE_F - Number of failed full copies
4.  MBC_RD/s - Throughput of full copy reads in megabytes per second
5.  MBC_WR/s - Throughput of full copy writes in megabytes per second
6.  ATS - Number of successful locks
7.  ATSF - Number of failed locks
8.  ZERO - Number of successful block zero commands
9.  ZERO_F - Number of failed block zero commands
10.  MBZERO/s - Throughput of block zeros in megabytes per second
11.  DELETE - Number of successful unmap commands
12.  DELETE_F - Number of failed unmap commands
13.  MBDELS/s - How much data has been reclaimed

Now how about from the storage controller?  You'll need to go into diag mode, so please do be careful once you're in there.  In 7-Mode type priv set diag to enter diagnostics mode and then stats show vstorage


For Clustered Data ONTAP, enter diag mode by typing set diag and then statistics show -object vstorage  (Again, please be careful in diag mode)


The first number is the value and the second column is deltas.

So when you run your VAAI function, whether copying, provisioning storage, etc. have a window open to the CLI's so you can watch the counters.  If they start incrementing, you not only know VAAI is working, but how well it is.

Have a great weekend friends,

Until Next Time!
-Brain

Thursday, April 25, 2013

We're Almost at 10,000!

Hi Friends,

Not sure if you've noticed, but Glick's Gray Matter is almost at 10,000 hits!

It's been an awesome 6 months and I can't thank you enough for visiting my blog!  After all, there's no Glick's Gray Matter without YOU!  So with that being said, I'd love to hear what you'd like more of, less of, etc!  Please comment on this post with your ideas!  Thanks again and I promise to keep bringing you quality blogs!

-Neil (AKA Brain)


Wednesday, April 24, 2013

VMworld Session Voting is Open!!

Hi Friends,

It's that time of year again, VMworld!!  If you've never been it's quite cool!  I wanted to to let you know that voting for VMworld is now open!  Once you register or login as a previous register at the VMworld site you can vote for sessions.  NetApp has submitted a bunch of sessions and you can filter by using "NetApp".  The big names have put their name in the hat, including ME, and this is where I need your help!  Please vote for the NetApp submissions if you believe they'll be helpful.  My session will be around end user computing and I've partnered up with VMware to talk about all the goodness in VMware Horizon View 5.2 with NetApp.  So if you want to see Brain (AKA Neil) babbling away on stage, cast your vote!

-Brain


VAAI for Dummies - AKA VAAI for Me! - Part IV - Release The Clones!

Hi Everyone,

Today we're going to talk about Fast File Clone or also known as Native Snapshot Support.  This technology is near and dear to my heart since it's a VDI technology!  So Remember how I wrote that article a little while back about how VDI Cloning Can Cost You More Then You Think!?  If you haven't read it, I highly recommend it. :-)  This piece of VAAI technology helps eliminate the extra I/O the storage array needs to perform when using hypervisor snapshots because the snapshot process is now offloaded to the storage array.

So how does this work?  Along with the plugin in ESXi 5.1 you need VMware View Composer 5.2 and you get VMware View Composer Array Integration, or VCAI.  When clones are created both a flat-file and checkpoint file are created.  Instead of a snapshot, like traditional Linked Clones, a NetApp FlexClone is taken of the gold image.  During a refresh operation, the checkpoint file is re-cloned from the storage array so no snapshots are created on the ESXi server.  This also eliminates any 512 byte partial I/O if VMFSsparse is used instead of the new SEsparse.

So create some clones and take a look at the /vmfs/volumes directory.  You'll see there's a flat file that's the size of the original machine and might think, "Hey!  I'm losing all of my space savings using this technology instead of Linked Clones."  Ah, very perceptive my friends, but remember this is an NFS technology and these are thin provisioned clones which point back to the gold image, so only the changes actually take up any space!

NetApp has had the ability to create VDI FlexClones for some time now, but with VCAI, you don't have to use two separate tools anymore.  In the past, clones had to be created with VSC in vCenter and although you could import automatically if you wanted, you still could not do this functionality from View directly.  Now, from within View, choose to create Automated Linked Clones and once you hit Advanced Storage Options, select "Other Options" and "Use native NFS snapshots (VAAI)" and that's it!  Need to Refresh/Recompose, go ahead, it's all integrated now.


NetApp is currently working on certifying the technology and hopefully it will be certified soon!  When I hear the good news I'll be sure to pass it along.

Until Next Time Friends!

-Brain

Wednesday, April 17, 2013

VAAI for Dummies - AKA VAAI for Me! - Part III - Where's the ON/OFF Switch and Beyond!

Hi Folks,

After reading my blog I thought I would expand a bit on the ON/OFF capabilities and what they actually turn on and off when it comes to VAAI.  I kind of threw a lot out there and wanted to make a little more sense out of the mess I made.  All the stuff I wrote about installing and validating, that's great, but let's talk more about WHAT those on/off switches actually turn on and off.

In most cases this stuff is all on by default and in most cases you won't need to turn it off.  But what if your boss comes to you and says, "Hey prove to me this VAAI stuff works!"  or say you want to try and find a bottleneck, you can turn individual settings on and off to test.  Please do be careful!


Atomic Test and Set (ATS)
This is actually a really cool primitive!  Say you've got a machine on a LUN and you go and make a change.  When the metadata is updating, a SCSI reservation locks the entire LUN.  So while it's locked, no other ESX or ESXi servers can update the metadata.  In small environments this probably won't be a problem since this process is very quick, but as your environment increases in size, you'll be limited by SCSI reservations, how many machines can be stored on a VMFS volume and how many virtual machines can access the same VMFS datastore.  With ATS this issue is practically eliminated which can allow the environment to grow without this potential limitation.

To check the status and enable or disable ATS use the following commands at the CLI:
Status:
# esxcli system settings advanced list -o /VMFS3/HardwareAcceleratedLocking
Disable:
# esxcli system settings advanced set -i 0 -o /VMFS3/HardwareAcceleratedLocking
Enable:
# esxcli system settings advanced set -i 1 -o /VMFS3/HardwareAcceleratedLocking

XCOPY
Another very cool primitive!   Say you're copying a virtual machine or moving one from one datastore to another.  In the past ESX or ESXi had to read every block and than copy or move it.  While this function works just fine it does require more compute and network resources from the ESX/ESXi servers.  The extended copy tells the storage which blocks to copy or move and the storage goes and does it.  This lowers the demand on the compute and network resources while speeding up the copy or move.
To check the status and enable or disable extended copy for cloning use the following commands at the CLI:
Status:

# esxcli system settings advanced list -o /DataMover/HardwareAcceleratedMove

Disable:

# esxcli system settings set -i 0 -o /DataMover/HardwareAcceleratedMove

Enable:

# esxcli system settings set -i 1 -o /DataMover/HardwareAcceleratedMove

Write_Same
Yep another cool one.  Okay, so I think all the VAAI primitives are cool!  Say you create a virtual disk and want to use it right away.  Well, you'll have to wait a little bit since every block needs to have zeroes written to them.  Write_Same is cool because it not only offloads writing zeros, but the command will write patterns across sequential blocks.  You also get the eager or lazy zero capability.  Lazy zero will wait until the disks are accessed before it zeroes and eager zero, you got it, will zero the disks out right away!
To check the status and enable or disable Write_Same use the following commands at the CLI:
Status:

# esxcli system settings advanced list -o /DataMover/HardwareAcceleratedInit

Disable:

# esxcli system settings set -i 0 -o /DataMover/HardwareAcceleratedInit

Enable:
# esxcli system settings set -i 1 -o /DataMover/HardwareAcceleratedInit


ATS_Only
The neat thing about ATS_Only is with VMFS5 datastores, the default is ATS!  Do be careful with this one, please don't play in your production environment!  :-)
Status: 
# vmkfstools -Ph -v1 /vmfs/volumes/vaai_iscsi2
Disable:
# vmkfstools --configATSOnly 0 /dev/disks/<disk name>
Enable:
# vmkfstools --configATSOnly 1 /dev/disks/<disk name>

Yesterday I showed the GUI way to set ATS, XCOPY and Write_Same if you'd rather use the GUI.

Until Next Time!
-Brain


Tuesday, April 16, 2013

VAAI for Dummies - AKA VAAI for Me! - Part II - Where's the ON/OFF Switch??

Ahoy Ahoy,

Today I thought I'd do something a little different, instead of writing about a single feature in VAAI I thought I'd talk about something I struggled the most with, the on/off switch.  While researching for this blog I found this great blog written by Jason Langer!  Since VAAI is made up of a bundle of APIs for SAN and now for NAS there isn't a simple way to check to make sure everything is running, but I'm going to show you a few tricks that I hope will help!

Step 1.  Installing.

If you're running SAN and you're running a VAAI supported version of ESX or ESXi and your storage also supports VAAI, congratulations you've installed VAAI correctly!  HUH?!  Yep, for SAN it's already in there.  Okay, what about NAS?  Well, that's a bit more involved....

1. Go to VSC inside vCenter, and if you're not using NetApp, you should be able to get the plugin from your storage vendor.  Under Monitoring and Host Configuration, select the tools link.  At the bottom of the screen you'll see the NFS Plug-in for VMware VAAI.  Install the plug-in on your ESXi servers you want to have NAS VAAI functionality.


2.  Now lots make sure the plug-in was installed correctly.  Log onto your ESXi machine and type:
# esxcli software vib list | grep NetApp
NetAppNasPlugin                1.0-018                             NetApp  VMwareAccepted    2013-02-21

If you don't see the plug-in, something went wrong.  Remember, you need to reboot your ESXi host, but not the NetApp controller.

3.  Awesome, both SAN and NAS are installed and ready to go!  Well, sort of....  We now have to enable VAAI on the controller for NFS.  For both 7-Mode and Clustered ONTAP, we enable VAAI at the CLI.
      7-Mode:  options nfs.vstorage.enable on
      cDOT:  vserver nfs modify –vserver vserver_name -vstorage enabled

4.  Outstanding, now your NetApp is ready!  So you're ready right?!  Well, maybe....  There's a few settings that should be ready to go, but let's double check, just in case.

5.  Log into vCenter and click on one of your ESXi servers.  Select Configuration and than the Advanced Settings link under Software.  Now check for "DataMover" and "VMFS3".  Check to make sure these three settings are set to "1".  If they're not, some of the VAAI functions aren't going to work.


And I haven't forgotten about my CLI fans.  If you don't want to check in the GUI, go to the CLI and type:
# esxcli system settings advanced list -o /DataMover/HardwareAcceleratedMove
# esxcli system settings advanced list -o /DataMover/HardwareAcceleratedInit
# esxcli system settings advanced list -o /VMFS3/HardwareAcceleratedLocking


Look for a value of   "Int Value: 1", that means it's enabled.

6.  Okay so now we're ready right?!  Well sorta...  Couple more things to check.  Let's make sure the storage devices are VAAI ready.  Go back to your CLI window and type:
 # esxcli storage core device list

This will give you a full list of all your devices attached to your ESXi box.  Grab the "naa" identifier of one of your NetApp devices and type:
 # esxcli storage core device vaai status get -d naa.60a9800032466635635d414c45554356
naa.60a9800032466635635d414c45554356
   VAAI Plugin Name: VMW_VAAIP_NETAPP
   ATS Status: supported
   Clone Status: supported
   Zero Status: supported
   Delete Status: supported


How about ATS-Only?(It's a new feature I'll cover in a later blog)  Type: (where vaai_iscsi2 is the name of your datastore you want to check)
 # vmkfstools -Ph -v1 /vmfs/volumes/vaai_iscsi2
 VMFS-5.58 file system spanning 1 partitions.
File system label (if any): vaai_iscsi2
Mode: public ATS-only
Capacity 100 GB, 99.1 GB available, file block size 1 MB
Volume Creation Time: Thu Apr 11 20:48:33 2013
Files (max/free): 130000/129992
Ptr Blocks (max/free): 64512/64496
Sub Blocks (max/free): 32000/32000
Secondary Ptr Blocks (max/free): 256/256
File Blocks (overcommit/used/overcommit %): 0/971/0
Ptr Blocks  (overcommit/used/overcommit %): 0/16/0
Sub Blocks  (overcommit/used/overcommit %): 0/0/0
UUID: 516721a1-dd91425c-ee36-00c0dd1bcac4
Partitions spanned (on "lvm"):
        naa.60a9800032466635635d414c45554356:1
Is Native Snapshot Capable: YES
OBJLIB-LIB : ObjLib cleanup done.


Excellent, looking great!  Functionality is listed as supported, ATS-Only is set, let's just check one more thing inside the GUI and away we'll go!

7.  Log into vCenter and click on an ESXi server and select Configuration > Storage Adapters.  Select the storage you want to check, in this case iSCSI, and look at the bottom of the screen.  As shown here Hardware Acceleration is listed as "Supported".


8.  Now head to VSC in vCenter and under Monitoring and Host Configuration select Overview.  Take a look at the VAAI Capable column.
Congratulations, you're good to go!  Remember to check the functions of your storage, because some of the VAAI functions might not be enabled for your storage vendor.  In another blog I'll show you how to use ESXTOP so you can see that VAAI is actually working. :-)

Enjoy!
-Brain

Monday, April 15, 2013

VAAI for Dummies - AKA VAAI for Me! - Part I

Hi There,

I've been away for awhile because I've been doing a lot of testing and document writing.  I'm currently working on updating a VAAI document with all the new VMware and NetApp goodies!  For those who aren't familiar with VAAI it is the vStorage APIs for Array Integration.  A few years back there was a joint effort among VMware, and some storage companies to allow storage to talk to VMware through API's, SCSI and primitive commands that normally get communicated over the wire.  By doing this a lot of work can be optimized because the storage would handle it.  Want to use VAAI?  Make sure your storage vendor supports them and that you're on a version of vSphere that does as well.

Now for some reason I really had a tough time with VAAI.  Not the concept, but the actual practical usage of the different APIs.  To add to the confusion in ESXi 5.1 VMware added more functionality!  So what did I find difficult?  Well for starters, how the heck do I tell if the thing is on and working!  A lot of the abilities are just "on" and start working.  I'm hoping that my confusion and deep dive into the technology will help you from going through similar difficulties and confusion!

Since VAAI is broken up into multiple capabilities, I felt a single article would not do it justice, therefore I'm going to write a series of VAAI blogs, unless they are wildly unpopular!  :-)  Big thanks to Cormac Hogan and Peter Learmonth who's papers were invaluable while exploring the deep and dark recesses of VAAI!!  Enjoy!

Today were going to talk about Dead Space Reclamation this is one of those new primitives I was telling you about. Why start with this one?  It's unique that you have to kick a command off to get it to work.  Dead Space Reclamation will clean up block storage if a virtual machine is stored on a thin provisioned datastore on a LUN and the machine is either deleted or moved to another datastore.  What? What? What?

Okay, say you create 100G LUN on your NetApp and turn on thin provisioning.  You assign the LUN to vSphere and install a 20G machine, but the machine is only using 5 gig.  At the vSphere and NetApp layer you'd only use up 5 gigs.  Now, I decide I need to either delete the machine or move it to another datastore.  After the delete/move vSphere reports all 5 gigs are back and ready for usage, but if you checked your storage it still thinks 5 gigs are used up because storage doesn't look into LUNs.  This is where this feature is useful, you tell your ESXi server to create a file that will consume a certain amount of space and give it back to the controller once you're done!

One thing you need to be careful is how much you tell ESXi to grow this file.  Remember, you'll probably have other data on this datastore, so using 90 or 100% would be a bad idea. :-)  In Cormac's document he uses an example of 60% and I like that number!  If you're worried about a performance impact, start with smaller numbers and slowly ramp up to larger percentages to avoid swamping your controllers.(Thanks to Jenn Schrie for this input!!)  So how do you do this?

1. Here's a LUN that has thin provisioning and is using about 7G of storage:
f35*> lun show -v /vol/vaai_iscsi2/vaai_iscsi2
        /vol/vaai_iscsi2/vaai_iscsi2  100.2g (107642617856)  (r/w, online, mapped)
                Comment: "The Provisioning and Cloning capability created this lun at the request of Administrator"
                Serial#: 2Ff5c]ALEUCV
                Share: none
                Space Reservation: disabled
                Multiprotocol Type: vmware
                Maps: rcu_generated=3
                Occupied Size:    6.7g (7168028672)
                Creation Time: Thu Apr 11 13:38:15 PDT 2013
                Alignment: aligned
                Cluster Shared Volume Information: 0x0
                Space_alloc: enabled


2. Check your LUN on the ESXi side to make sure it has this VAAI capability and is thin provisioned:

esxcli storage core device list
naa.60a9800032466635635d414c45554356
   Display Name: NETAPP iSCSI Disk (naa.60a9800032466635635d414c45554356)
   Has Settable Display Name: true
   Size: 102656
   Device Type: Direct-Access
   Multipath Plugin: NMP
   Devfs Path: /vmfs/devices/disks/naa.60a9800032466635635d414c45554356
   Vendor: NETAPP
   Model: LUN
   Revision: 811a
   SCSI Level: 4
   Is Pseudo: false
   Status: on
   Is RDM Capable: true
   Is Local: false
   Is Removable: false
   Is SSD: false
   Is Offline: false
   Is Perennially Reserved: false
   Queue Full Sample Size: 0
   Queue Full Threshold: 0
   Thin Provisioning Status: yes
   Attached Filters: VAAI_FILTER
   VAAI Status: supported
   Other UIDs: vml.020003000060a9800032466635635d414c455543564c554e202020
   Is Local SAS Device: false
       Is Boot USB Device: false

   
esxcli storage core device vaai status get -d naa.60a9800032466635635d414c45554356
naa.60a9800032466635635d414c45554356
   VAAI Plugin Name: VMW_VAAIP_NETAPP
   ATS Status: supported
   Clone Status: supported
   Zero Status: supported
   Delete Status: supported


3.  Delete or migrate the virtual machine.

4.  Check your LUN again:
f35*> lun show -v /vol/vaai_iscsi2/vaai_iscsi2
        /vol/vaai_iscsi2/vaai_iscsi2  100.2g (107642617856)  (r/w, online, mapped)
                Comment: "The Provisioning and Cloning capability created this lun at the request of Administrator"
                Serial#: 2Ff5c]ALEUCV
                Share: none
                Space Reservation: disabled
                Multiprotocol Type: vmware
                Maps: rcu_generated=3
                Occupied Size:    6.7g (7168028672)
                Creation Time: Thu Apr 11 13:38:15 PDT 2013
                Alignment: aligned
                Cluster Shared Volume Information: 0x0
                Space_alloc: enabled

As you can see, still using up 6.7G.

5. Log onto your ESXi machine where the LUN is mounted and change directory into the /vmfs/volumes directory where the datastore is located.

6. Run the reclamation command: 
vmkfstools -y 60
Attempting to reclaim 60% of free capacity 99.1 GB (59.4 GB) on VMFS-5 file system 'vaai_iscsi2' with max file size 64 TB.
Creating file .vmfsBalloonLrxcCO of size 59.4 GB to reclaim free blocks.

Done.

7. Check on your storage again:
 f35*> lun show -v /vol/vaai_iscsi2/vaai_iscsi2
        /vol/vaai_iscsi2/vaai_iscsi2  100.2g (107642617856)  (r/w, online, mapped)
                Comment: "The Provisioning and Cloning capability created this lun at the request of Administrator"
                Serial#: 2Ff5c]ALEUCV
                Share: none
                Space Reservation: disabled
                Multiprotocol Type: vmware
                Maps: rcu_generated=3
                Occupied Size:   87.3m (91533312)
                Creation Time: Thu Apr 11 13:38:15 PDT 2013
                Alignment: aligned
                Cluster Shared Volume Information: 0x0
                Space_alloc: enabled


I hope this blog was helpful and that you'll enjoy what I've got planned for the others!

Until Next Time!
-Brain
 

Thursday, April 4, 2013

Didja Know? Functional Alignment in VSC 4.x!

Ahoy,

Since I've been on an alignment kick, I thought I'd dive into one of the new features available in our Virtual Storage Console (VSC).  We all hate misalignment, it creeps into our virtual environments and causes all kinds of havoc, like termites or roaches!  In the past the only way to solve misalignment is you have to shut down the virtual machine, there was NO way around it.  There's all kinds of great tools out there that can get you 90+% there without an outage, but just like fumigating those nasty buggers you've gotta vacate the house and let the exterminator do his job!  Until now!  Take that you little beasties!

VSC has a super cool new feature called Optimization and Migration.  This feature lets you logically align your misaligned virtual machines while they're running.  NO DOWNTIME!  Okay, okay, you're thinking, "Awww, there's the catch, logically align!"  So what do we do?  We create a new datastore that's shimmed to bump the alignment off to push the alignment of the unaligned machine to logically aligned.  Than we do a Storage vMotion to move the VM to the new datastore.  Just like in Algebra, two negatives make a positive!  There's also another catch, currently the feature is only block supported.  But no fears NAS fans, if you want to use the feature, just contact your account representative and let them know you want to give it a try.

Here's the part I like the best, the detailed steps!

 1.  So here we have our misaligned machine.  We see it's misaligned when we try to do a rapid clone.


2.  So next we go back to our Home screen in vCenter and choose the NetApp N.
3.  Once there select the Optimization and Migration tab and select Scan Manager.  Select the datastore the misaligned machine lives on and click Scan selected.


4. You'll notice the Scanner status is RUNNING.


5.  Once the Scanner status is IDLE you're ready to begin smooshing those nasty misaligned machines!
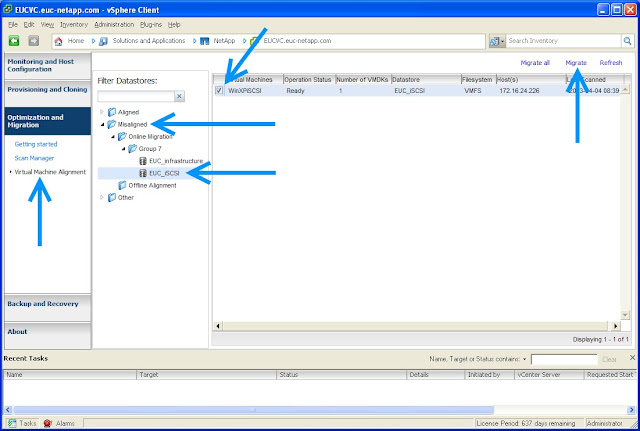
6.  Click on Virtual Machine Alignment link, expand the Misaligned folder and click on the datastore you scanned earlier.  You should now see your misaligned machines.  Here mine is WinXPiSCSI.  Select the machine(s) you want to logically align and click on the Migrate link.

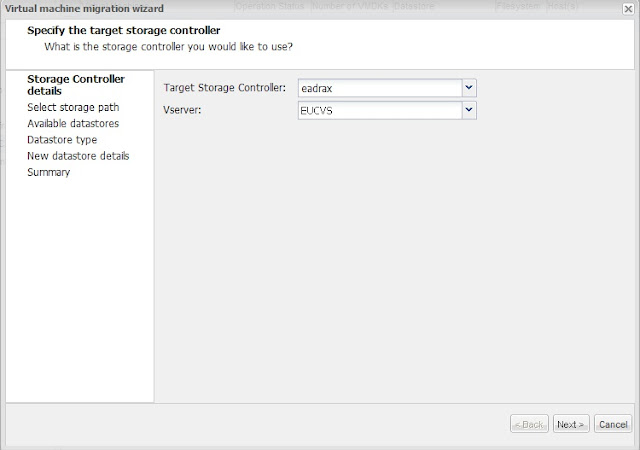
7.  You'll now be presented with a very similar set of screens when you create a new datastore in VSC.  Select storage controller and Vserver (if you have one).

8.  Here's where things are a little different.  You might see this screen and want to use an existing datastore, but the key here is VSC actually creates a new datastore that has the shim offset built-in.  So if you don't one of these special datastores created yet, you'll need to let VSC create a new one for you.
 
 9.  Next tell VSC you'll be using VMFS. (Remember if you want to use NAS contact your account team!)


10.  Select the Protocol, Size of the new datastore,  the datastore's name, if you want VSC to create a new volume or not, the aggregate, whether to use thin provision and the block size.


11.  You'll be presented with a summary screen.  If everything looks good, click Finish!
12.  Once the migration is complete go back into Optimization and Migration and you'll notice your new datastore has been created and is labeled as Optimized - Yes.
 
13.  Go back into Virtual Machine Alignment and you'll notice your virtual machine is now in the Functionally aligned folder!


Now the only bummer is if you go to clone this virtual machine, you'll still get a misaligned warning.  You have to remember that the virtual machine IS still misaligned, but NetApp has shimmed it's storage to cancel out the misalignment nastiness.  If you want to physically align the machine, use any one of the many tools out there.  My last article showed you how to align with VMware Converter, but there's also a converter that you can download from within VSC called MBRAlign.  It's under the Tools link inside the Monitoring and Host Configuration tab in VSC.

Tuesday, April 2, 2013

Metrics Time! Please Vote!

Hi All,

I'm very interested in knowing how you found my blog.  If you wouldn't mind, please let me know!  The vote is now open and can be found on the right hand side of the page.

Thanks in advance,
Neil

Monday, April 1, 2013

Citrix on NetApp Clustered ONTAP - Best Practices and More!

Ahoy Ahoy,

I have some very exciting news!


Rachel Zhu and I would like to present our latest Citrix paper! This was a huge endeavor of testing XenDesktop, XenApp, Profile Management, Backup and Recovery, Performance Analysis, and the kitchen sink all on Clustered ONTAP! HUGE thanks to Will Strickland who did all of our performance testing!!

Learn the best practices of Citrix VDI on NetApp Clustered ONTAP as well as how to backup and recover your user's data using NetApp tools.

The paper is available here! 

http://www.netapp.com/us/System/pdf-reader.aspx?m=tr-4138.pdf

We hope you enjoy it and that it helps answer questions you have regarding NetApp Clustered ONTAP in Citrix VDI environments!