Welcome to the next blog on Nimble Storage Setup - So Easy, Even *I* Can Do It! - Part III. Today I'm going to show you how easy it is to create a volume and setup up snapshots to protect your new volume.
Yesterday I stopped at the password entry screen. Once you've entered your password you'll come to the home screen which provides all kinds of great information and metrics. Mine is pretty boring because I just set it up.
On to the volume creation!
1. On the top of the screen you've got a bunch of choices, but we're going to click on Manage and then select Volumes.
5. You can select 4, 8, 16 or 32KB and you can specify if you want compression and/or caching turned on. And if you don't want to have to mess with any of this you can just select "default". As seen in step 3.
6. Once you've selected your Performance Policy, you select your access controls. The nice thing about this is you can be as selective or open as you want with permissions to your iSCSI volumes. If you want every machine can have access or just certain machines or just one. Very, pardon the pun, nimble. Now select if you'd like to allow multiple initiator access.
7. Select the size you'd like your volume to be and whether this volume is thin provisioned how much data can be put onto the volume, warnings, snapshot reserves and snapshot warnings. This is personal preference, so experiment a bit to see what works best for you.
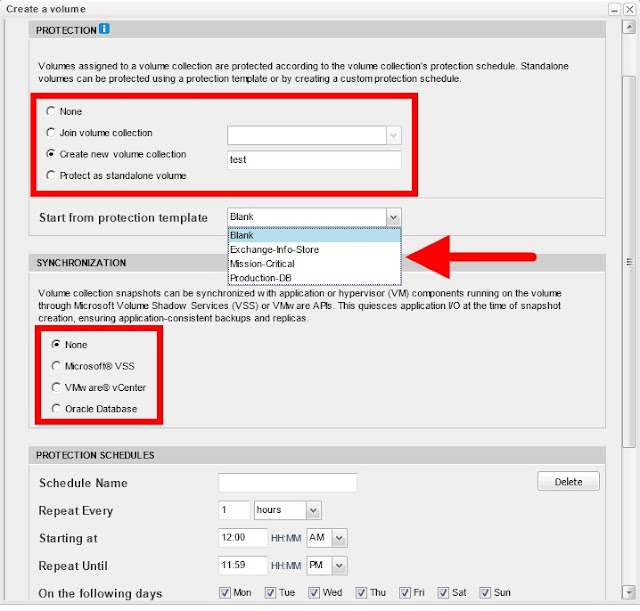
8. Now we'll protect our volume. If it's just a test and you don't care about snapshots, just select None, but if it is something you'd like to protect you have a few choices here. If you've already created a volume collection group for protecting, you can assign it here. If you'd like to create a new volume collection because you're going to be creating similar volumes or something like that, you can select create new volume collection. If it's just a single volume that you'd like protected, go ahead and select protect as a standalone volume. By creating volume collections, you can easily add new volumes to existing volume collections, but again, choose what works best for you.
9. Here I'm selecting a new volume collection. You can select pre-created protection templates or create your own. The synchronization feature is really awesome. For example, you can select VMware vCenter, put in your credentials and the array will work with vCenter to quiesce those virtual machines for you before a snapshot is created. Makes sense right? Why is this unbelievably cool? If you've ever been in charge of backups you'll understand because the last thing a backup administrator wants to get is the error that some files/machines could not be backed up because there were files open!
10. Next you'll create your schedule of backups, when, what time, how often and if you want to replicate those snapshots to another array.
11. Click Finish and your volume is created! Here I'm back at the Volumes page, you can see the neil-test volume has been created.
I not only enjoy how easy it is to create the volume, but also the choices I'm given. If I want to just take defaults I can zoom through the process. I can also be very particular and take my time customizing my volume exactly the way I want it. Another extremely useful feature is the helpful tips displayed on the menus as you go along. It's super easy and the tips put the icing on the cake by explaining what feature you're setting and how it works.
That's it for today friends. Tomorrow I'll focus on iSCSI initiators and getting the newly created volume into ESXi.
Until Next Time!
-Brain


Sup! Good set of blogs. I have a suggestion for future blogs -- do you have anything on the requirements for storage for Citrix MCS versus PVS and how does nimble work for both?
ReplyDeleteGlad you're enjoying the blogs! That is a great suggestion and is something I will definitely work on in the near future. Thanks for the comment and suggestion, it helps me provide better content and focus on what you'd like to see!
ReplyDeleteBest Regards,
Neil