Today I'm going to show you how to install an OS on one of your UCS blades or rack-mount servers. My buddy Wen has a great blog that shows you how to boot from a Nimble iSCSI LUN, so I'm going to show you how it's done from local disk with XenServer. XenServer has a cool feature called IntelliCache that uses local disks to intelligently cache the work being done by the hypervisor.
Let's get started. I'm going to assume you don't have a service profile yet for this new server.
1. Click on the Servers tab. Now choose the method you're like best to create a service profile. I'm going to create a clone, but if you prefer you can always create a new one. Right click on a profile you wish to clone and select clone.
2. Give the clone a new name and which organization it will belong to.
3. When the clone is completed you'll get a pop up that tells you. Click OK to continue.
4. Find the service profile you just created and now it's time to make some decisions with regards to your environment. For example, the Fabric ID, the MTU, Adapter Policy and VLAN of each vNIC. Remember, you can add or remove vNICs per your need. Isn't that cool?!
5. For example. I've decided to modify one of my VLANs on one of my vNICs. In a previous blog I showed you how to easily create VLANs with the Cisco UCS. Take a look if you need help on that step.
6. If you're not already clicked on your new service profile, click on it and select Boot Order from the tab on the right hand side. Here we're going to select how we want the blade or rack-mount to boot. Since I cloned this service profile I already have CDROM first and Local Storage second. If you decide to build your service profile you can select these once you get to the Boot Order portion.
7. It's time to associate your newly created service profile with a blade or rack-mount server. Click on the Equipment tab and select which server you'd like to use. Notice in the middle of the page this server has not been associated with a profile. Be careful, you don't want to take your co-workers server! :-) On the right you can see a picture of what the actual server I'm going to install on looks like. Snazzy, very snazzy!
8. Now click on that Associate Service Profile link and we'll choose the one we created. Click OK.
9. You'll probably get a message like this telling you the UCS needs to reboot the blade. Click Yes to continue. Remember, double check that this is your blade!
10. Notice the Associate Service Profile is now grayed out. You've successfully associated your service profile to the blade or rack-mount server. Now lets go to the KVM and get our OS started! Click on the KVM Console link.
11. Once the KVM comes up, click on the Virtual Media tab and select Add Image. We're going to point UCS at an ISO image.
12. Put the ISO where it's convenient for you. Here I'm just getting it from the local desktop. Click Open.
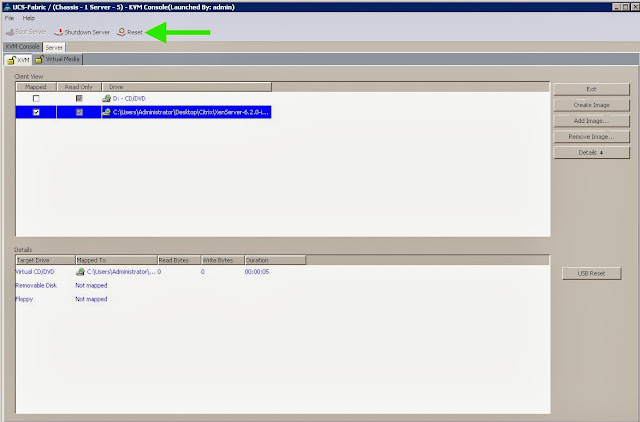
13. Make sure the ISO is mapped and click on the Reset button to begin the install.
Warning: This will OVERWRITE whatever is on that local disk, make sure there's nothing there you want to keep!

14. The build begins, now just follow the prompts.
I hope you enjoyed my blog on creating service profiles and installing on OS on Cisco UCS.
Until Next Time!
-Brain


No comments:
Post a Comment