I've been busy learning all about VMware's new cool VDI technology, App Volumes. Let's set the Wayback machine to the dawn of virtual desktops.
In the early days, VDI was easy. You had a bunch of non-persistent desktops that reset themselves after each use, didn't need customization or special user applications or profile settings. These were created for call centers, libraries or wherever someone just needed a desktop for temporary use, logged in, logged out and everybody was happy!
But what happens when you need to create a desktop for someone like me? I have specific applications I need, save data to my computer, have a certain look and feel I've come to expect. Sheesh, what happened to simple non-persistent desktops? I had to go and make it all complicated!
Okay, so how do I get the non-persistence and ease of use administrators need, but the customization and persistence users demand?
VMware App Volumes! That's right, VMware has done a really awesome job balancing out the ease of non-persistence and the customization of full persistence Knowledge Workers have come to expect.
App Volumes is pretty packed with cool stuff, so I'm going to break the technology out into a few blogs. Today I'm going to talk about AppStacks. AppStacks allow administrators to install and assign applications to individual users or desktops as needed. Yep, that's right, if you're a VDI admin and you've got users demanding certain applications or departments bugging you to install certain apps, this might be the answer!
The first step is to choose a desktop to install the application on. Here I've chosen to install on a desktop called AppVolumes2. I think it's a good idea to take a snapshot of the desktop before you start making changes just in things don't go to plan. Tintri snapshots would be a good choice, they're fast and space efficient!
Okay, after you've selected which desktop will be the install desktop, go to the App Volumes GUI and select Create AppStack.
Give your AppStack a name, what storage it will use, the path and where the template lives. Here I'm using a T5080, Tintri's top of the line all flash array.
One the AppStack has been created, next we need to attach it to our install desktop so the application can be installed and put under control of App Volumes. Here we've got our newly created AppStack and I select Provision.
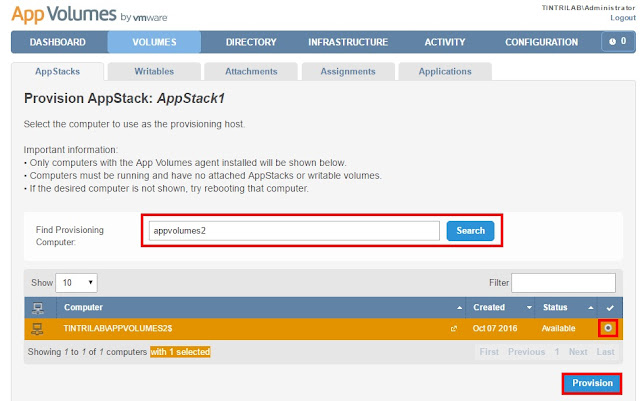
Remember when I said to pick a machine to be the install machine? Here's were we search Active Directory for that machine. When you find your machine, click on Provision.

Here we can see the AppStack is being attached to appvolumes2.
Okay, the AppStack is attached to appvolumes2 and as the message says, it's time to install our application.
We're connected to appvolumes2 and we can see the App Volumes message telling us we're in provisioning mode and to click OK after the install is done.
I've chosen to install Notepad++. If you haven't had a chance to take a look at Notepad++ it's a really cool program that gives Notepad like capabilities but MUCH MUCH more!! Definitely worth a look if you're looking at logs and opening text files a lot.
The next step is to install your application like you normally would.
Awesome, our application has been installed! Click on the OK button and we'll proceed to the next step.
FYI, I didn't show it, but I deleted the installer because we're done with it.
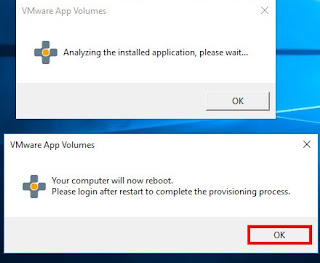
The application is analyzed by App Volumes and then a dialog box will pop up telling you to click the OK button to complete the process and reboot the computer.
If everything works okay you'll be greeted with this dialog box that tells you the provisioning was successful.
Back to our App Volumes GUI, we can see the application installed and it's time to assign the application. Wait a second, I thought we installed it on appvolumes2?!?! Well, yes and no. We did install it on appvolumes2, but it wasn't really installing it on that machine, it was recording the installation procedure so we can put the app on any computer we want.
Now, this part is cool! We can assign the application to certain machines AND/OR users. Pretty cool huh? So here I'm going to assign the appliation to avtest1. This way the user will get Notepad++ regardless of which computer they log into.
Now, the test! If I log into appvolumes2 as user avtest1 will Notepad++ be there?
Yep, there it is. But, here's the big test, what if I log into appvolumes3 with user avtest1?
Yep, there it is!! How cool is that?!
Okay, but what happens if I log back into appvolumes2 as a different user? Here I'm logging in as avtest2. Now remember, avtest2 wasn't given access to the application.
No application! VERY cool!
Now this is just the tip of the iceberg, there's TONS more for me to show you. Writable App Volumes, backup and recovery, the list goes on!
Be on the lookout for the continuing saga of App Volumes!!!
Until Next Time
-Brain


No comments:
Post a Comment