Monday, February 23, 2015

Microsoft Windows File Sharing with Nimble Storage - Direct Attached

Hi Friends,

A few blogs ago I showed you how easy it is to set up a Windows File Share on Nimble Storage using VMware with VMDK attached storage.  But what if you want to directly attach Nimble to a physical or virtual host using iSCSI?  Remember onions, ogres and file shares have layers.



The first thing you'll need is to download and install the Nimble Storage, Windows Toolkit, you can get that off the InfoSight site.  In the toolkit you'll get the Nimble Connection Manager and Setup Manager.  The setup manager is for setting up arrays, so we're going to focus on the connection manager.  We'll want to use the connection manager instead of the native Microsoft iSCSI Initiator tool since the Nimble tool has lots of cool Nimble smart stuff built right in!


When you launch the connection manager you'll see the addresses of the file share server on the System Settings page.  Select the addresses you want data traffic to go over.  Here I'm selecting two 10 gig IP addresses in Included that can talk to my storage.  The two in Excluded are my management and a private IP I use for client machines.  Yours will probably look different, but the concept is the same.

Next we'll add our Nimble discovery address so Windows and Nimble can talk to each other.  Click on Add > Advanced and enter the IP of your Nimble discovery address.


You can get this from the Nimble Storage GUI.  Administration > Network Configuration > Active Settings.


After we add the discovery IP address, you should see the Nimble Storage volume.  The red X circle on the volume indicates the volume hasn't been connected yet.  Click on the Connect button.


We've got a few choices, but typically the default "Connect on startup" works.  The other options are there if your environment needs the extra settings.


You should now get the green check mark, the size, connections, etc.  Let's click on Properties to see some important information.  Here I've got 4 paths to the volume, which is a Nimble best practice.  You can add more paths through a Windows registry setting, but 4 active paths is recommended.


Head over to Windows Computer Management > Disk Management and you can setup the new drive.  Here my drive is setup and ready to go!


Hooray, you're done!


Until Next Time!
-Brain

Thursday, February 19, 2015

Microsoft Windows File Sharing - User Initiated Single File Restore with Shadow Copies

Hi Friends,

We've been on a fun file sharing adventure and like all fun rides it must come to an end, BUT not yet!  Another big thanks to Kevin for his idea for this blog!

Today we're going to talk about backups and single file recovery.  Normally backups aren't seen as sexy or rock star technology.  They are more like a toilet.  Day after day our toilets take and take and take and ask nothing in return.  We all take our toilets for granted until they stop working, and for a brief moment we realize how much we LOVE our toilets!


Like toilets, backups just silently run in the background and no one really cares until an important file has been deleted, changed or corrupted.  I've written a couple of blogs on how to recover entire volumes and single files using Nimble Storage snapshots, but what if I want to empower my users to recover their own files?  That's where Microsoft Shadow Copies come in.  This is a very cool tool, but like all tools if you're not careful, you can hurt yourself with it.


Let's head over to our file share server and set up those Shadow Copies!  Right click on your share drive and select the Shadow Copies tab.  Here you can see I'm already taking copies of my Z:\ drive.  Something to note is the Used column.  When you create Shadow Copies you will be using space, so keep an eye on that.  You can set how much space you want Shadow Copies to use, schedules, all kinds of cool stuff.  Take a look on the left hand side.  I've got two users set up to have their home directories use this Z:\ drive.  I set that up in Active Directory.  The nice thing is user1 sees his stuff, but not user2's stuff and vice verse.


Here I'm logged into another machine as user1 and my home directory is mounted as drive W:\.


Let's say I delete one of my files.  I'm quite distraught until I remember my system administrator has set up Shadow Copies so I can go and restore the file on my own.


I right click on my home directory and select properties.  Now I've got a few choices and I've got to be careful here!  If I'm not careful I can make a terrible mess of my home directory.  I've got 4 images to choose from and I can Open the backup, Copy the backup or Restore it.  If I Open the image I can select specific files to restore.  If I Copy the image I can select an alternate location to restore ALL the files.  If I Restore, I over write any files with the same name.  Be careful with the Restore!


So what does an Open look like?  Let's take a look.  Here I've opened up the 2/18/2015, 2:48 PM image.  And my user1_file2.txt file is there!  From here I can copy it to where ever I want.


This is a very powerful tool which will empower your users to recover files ASAP without having to wait or rely on someone else.  Just remember there are caveats and to be aware of them.

Until Next Time!
-Brain


Friday, February 13, 2015

Neil in Your Email is Working Again!

Hi Friends,

Not sure what happened, but I think receiving emails from Glick's Gray Matter is working again!  It wasn't working for quite a while and than all of a sudden I got an email with over 20 blogs in it!!  Sorry for the inconsistency in updates, hopefully it's fixed.  :-)  If you're new to Glick's Gray Matter and want to get emails whenever I babble, just put in your email address and click on subscribe!


Until Next Time!
-Brain

Thursday, February 12, 2015

Nimble Storage at VMware Virtual VMUG - Tuesday, February 17th!

Hi Friends,

Travel budget restrictions got you down?  Is the boss being a total downer and not letting you travel to VMware VMUGs?  Well friends, I have the perfect solution!  VMware is holding a virtual VMUG on the 17th of February and Nimble Storage will be there.  Plus your buddy Brain will be there to answer all your Nimble Storage questions!

http://www.vmug.com/VirtualEvent


Just look at all these cool sponsors.  Did I mention I'll be there?


See you on Tuesday!
-Brain

Glick's Gray Matter Has Hit 100,000 Views!!

Hi Friends,

Can you believe it??  I've hit 100,000 views!!  I can't believe it!  I know celebrity sites probably hit 100,000 views before noon, but for me this is a big deal.  I can't thank all of my readers enough!  And a special thanks to my wonderful wife for all of her great ideas and support!!  As I said in an earlier post, if you keep reading, I'll keep writing.

This calls for fireworks and party hats!!


All The Best!
-Brain

Wednesday, February 11, 2015

Dedupe is Great, but What Affect Does it Have on Nimble Storage?

Hi Friends,

I got a great question on my Microsoft Windows File Sharing with Nimble Storage - What About Deduplication?  blog that I felt it deserved a blog of it's own instead of a response.

The question is, "Did you see a big increase in the cache consumption as the dedupe process churns through your files?"

Again, fantastic question.  Too many times we get focused on the trees and forget about the forest.  What does that mean?  We get obsessed on the end goal and forget our actions can have an affect on the system as a whole and it may not be a positive affect.  For example, I want to make my car faster, so I get an aftermarket turbo, a cat-back exhaust and maybe I start wandering into stage 2 or 3 mods.  Will the car perform better?  Maybe...  But as any car guy can tell you if you start changing one thing without changing others you might start damaging the car.


The same can be true with technology.  If I bolt on dedupe through the operating system, am I going to mess up my storage performance on a whole?  The person that asked the question wanted to know and so did I.

So here's what I did, I ran a Vdbench workload with some SMB clients accessing the file share doing a 50/50 read/write split.  While the performance test was running I kicked off deduplication on a volume that had data on it, but had not been deduped before.  I'm happy to report the array handled the dedupe like a champ!  The only thing I saw was a little additional read throughput, no drop in cache hit (100% cache hit), no drop in IOPS.  Let's have a look!


But remember, you mileage will vary, so it's always important to test performance modifications before you go into production or the track!  :-)

Until Next Time!
-Brain

Tuesday, February 10, 2015

Almost There... Stay on Target!!


Microsoft Windows File Sharing with Nimble Storage - What About Deduplication?

Hi Friends,

One of my Systems Engineers read my blog and mentioned deduplication.  That's the cool thing about technical people, they're always looking for ways to make something cool even better.  Thanks for the suggestion Kevin!  With Nimble you get thin provisioning and compression built right in, but what about deduplication?  Users are notorious for saving 300 copies of the same document and with Microsoft Windows 2012 R2 we can deduplicate on the file server itself.  So let's go find out how much disk space we can save with native Nimble Storage compression and Microsoft Windows 2012 R2 deduplication.


The first thing we need to do is install the deduplication role on our file server if it's not already there.  It's located under File and Storage Services.


Now let's head over to Server Manager > File and Storage Services > Volumes.  Here we see our different drives.  Right click and select Configure Data Deduplication.


Select Configure Data Deduplication.  Note the capacity and the free space.

Here I select General purpose file server, cause well, it's a file server.  :-)  You can also select it as a VDI server.  Choose the age of the files to deduplicate, any file types or folders to exclude.  Now let's set up a schedule.  Click on the Set Deduplication Schedule... button.


Here's I've selected Enable background optimization and Enable throughput optimization.  Basically I've told Windows to throttle the deduplication process so it doesn't impact the system.  Pretty cool eh?  And the second option let's Windows dedupe without any restrictions during certain hours.  This would be good during quiet times when your users are at home asleep.


Now just sit back and enjoy the space savings!  But Brain, what about the effects to the file server and Nimble Storage?  Ugh, okay, here are some graphs....

Here's a deduplication running not being throttled.  Yeah, yeah, I know the screen shot above says 1:45am, I changed it after I took the screen shot.  7% CPU and 28% memory, not bad!  How about on the Nimble?


I kicked off the test around 11:41.  There's a little jump for 3 minutes and then the usage goes down to well, very little.  You're mileage will vary depending on your file server and storage platform.


So how about those storage savings?!


Woo Hoo!  111GB of savings!  But wait, that's not all!  How about compression on the Nimble side?


Awesome, 200 more gigs saved!


Pretty cool huh?!

Until Next Time!
-Brain

Tuesday, February 3, 2015

Microsoft Windows File Sharing with Nimble Storage - It Couldn't Be Easier

Hi Friends,

Today I wanted to show you how easy it is to set up a Microsoft Windows file share with Nimble Storage as the back end storage.  Now remember there's always more than one way to peel an onion! And like ogres and onions, file shares have layers!


Now before you decide that Brain has completely lost his mind, bear with me a bit here.


Generally speaking in a virtualized environment you've got a couple ways you can attach storage to your virtual machine.  You can use VMware to connect a VMDK or you can direct connect the storage using iSCSI or Fibre Channel.  I know, I know, there's RDM's too, but for simplicity I'm going to stick with those two methods.

So why would you choose one method over another?  Well, that's where the onion comes in.  Say I want to use VMware tools to take snapshots, vmotion machines around, use DRS to keep everything running, or SRM to fail one site over to another?  Basically I want to use all the goodness of VMware and VMware tools.  In that case I'd go for VMDK.  But what if I wanted to use native Microsoft tools, clustering and didn't need the VMware tools capability?  In that case I'd go for direct connect with iSCSI or FC.

In other words, how you attach your storage is really going to depend on how you want to administer it and what tools you want to use for backups, path management, etc.


The cool thing about the Nimble Storage array is that no matter what method you choose, it's still easy to setup and administer!

With that said, for this blog I'm going to show you how to create a file share volume, attach it to the Windows file share machine as a VMDK, apply best practices and how you can easily backup the datastore to protect the data that will reside on the share.  In another blog I'll demonstrate how to direct connect and all the goodies that go along with that.

Let's go to our Nimble array and create a volume.  We've got some choices here.  Do we choose default, VMware ESX 5 or Windows File Server?  Since we're attaching the storage to the host through a VMDK, we're going to choose VMware ESX 5.


That was easy, how about protecting our data?  The cool thing about Nimble is it has protection built right in and you can even synchronize with VMware vCenter!  If you were to just take a Nimble snapshot the machine would be crash consistent, but not machine consistent.  By synchronizing with vCenter, the machine will be quiesced before the snapshot is taken.


Here's where you'll create your schedule, when you want to the snapshots to occur, how often, how many to keep, and if want to replicate to another Nimble.  So say you have another Nimble at another site.  You can send your data there in case of fire, flood, asteroid, giant prehistoric monster....


Now how about multi-pathing?  Nimble's got you covered again!  Make sure to download the Nimble Connection Manager for VMware, you can get that from Nimble.


On your Windows file server, make sure the File Server Role has been installed.


Head over to Computer Management and initialize the new disk.


Now we'll format our new drive and put a file system on it.


Here we're sharing out the new volume.  The permissions and who can use the share will be up to you.

How about some Microsoft file sharing best practices?  Jose Barreto, who is a member of the File Server team at Microsoft, wrote a really great blog regarding the Microsoft Windows 2012 File Services Best Practices Analyzer (BPA).  You run it through Power Shell and it tells you if there are any issues with your file server, the severity and where to look for help to fix the issues.  Pretty cool!

You're all set!  Remember though, there are multiple ways to peel the file share, so my way is just a way and there are lots of other ways to do this and tweaks you can apply.


Until Next Time!
-Brain

Friday, January 30, 2015

Nimble Storage Syslog with Splunk

Hi Friends,

I wanted to share some cool new stuff I've been working on.  In Nimble OS 2.2.3.0 Syslog is now available!  Yep, you can get Nimble events sent to your syslog server to keep you updated on what's happening on your array.

Setup is a snap, click on Administration > Alerts & Monitoring > Syslog and it will take you to the syslog setup screen.


Once there just click on Enable Syslog Server, enter the IP or DNS name of your server and the port your syslog server is listening on.  Click Save and that's it!


If you're a CLI fan Nimble didn't forget about you, syslog can be setup through CLI as well.  If you've got questions, check out the Nimble Storage User Guide.

Okay, so now what?  I've set up syslog, but how do I get my events?  That's where Splunk comes in.  If you haven't heard of Splunk get ready to have your socks knocked off.  It's a super cool tool that does a TON of stuff!  I've set it up and haven't even scratched the surface. Splunk collects and analyzes data generated by infrastructure, security systems, and applications.  As I learn more I'll keep blogging about it.

I set up a simple syslog collection and I'm already receiving information about my array.  See those green bars towards the top of the page?  Those allow you to zoom in and out of times, VERY cool!


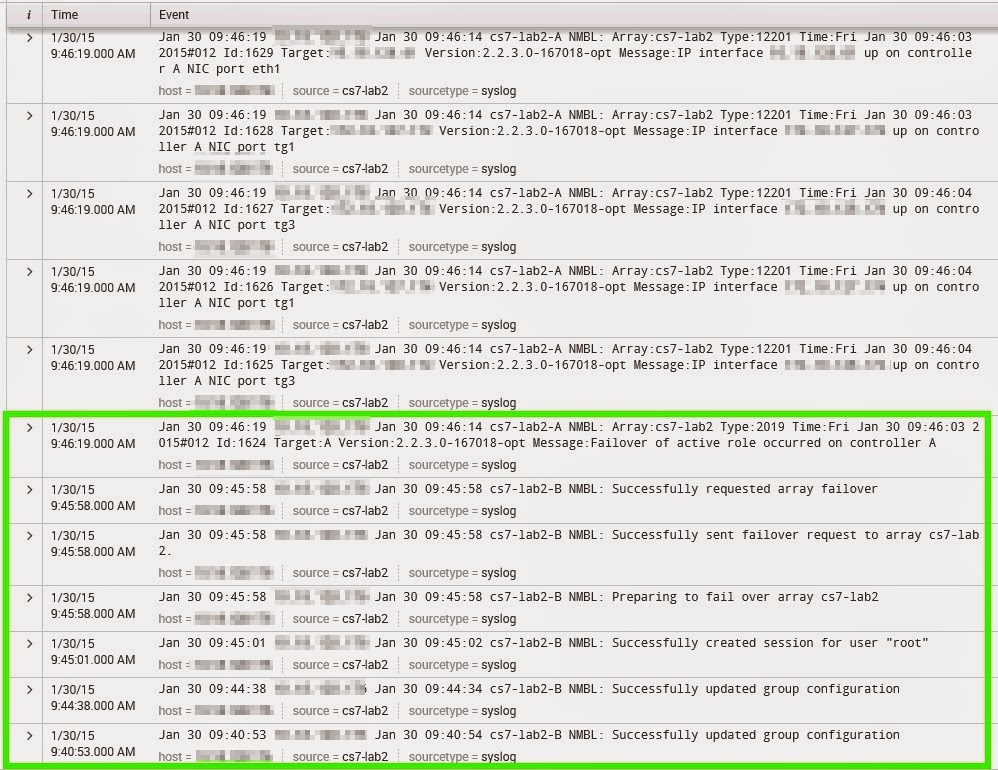
I did a storage controller failover to see if Splunk would capture it and what information I'd get.


Here you can see the failover initiated and successfully finished.  This is very handy!  There's tons more, but I wanted to show this cool capability that can help you keep an eye on your Nimble.

Until Next Time!
-Brain